There’s a special kind of magic in planting a single, humble clove of garlic in the fall and pulling up a full, fragrant bulb the following summer. The flavor of homegrown garlic is a revelation—intensely aromatic, complex, and worlds apart from anything you can buy at the store.
I know that taking on a crop with such a long growing season can seem intimidating, especially when its planting schedule is so different from most other vegetables. But I promise you, the process is surprisingly simple and deeply rewarding.
This guide is your complete, step-by-step roadmap. By following it, you’ll have all the knowledge and confidence you need to plant your first clove and harvest a beautiful crop.
It’s a wonderful journey, and it’s just one of the many I explore in my complete library of Vegetable Growing Guides.
New to Gardening? Start Here.
Before you dive into the specifics of growing garlic, it’s essential to have your garden basics covered. My comprehensive Beginner’s Guide to Starting a Garden will walk you through everything from choosing the perfect sunny spot and preparing your soil to selecting the right tools for the job.
Key Takeaways (TL;DR)
- Plant in the Fall: For the best results, garlic should be planted in the fall, about 4 to 6 weeks before your area’s first hard frost. This cold period is essential for the clove to develop into a full bulb.
- Choose the Right Type: Select Hardneck garlic for cold climates (it’s more winter-hardy and produces scapes) and Softneck garlic for milder climates (it stores longer and is great for braiding).
- Harvest the Scapes: If you’re growing a Hardneck variety, be sure to cut off the curling flower stalks, called scapes, in early summer. This delicious bonus harvest encourages the plant to put all its energy into growing a bigger bulb.
- Cure for Storage: After harvesting, garlic isn’t ready for storage right away. It must be “cured” by air-drying in a shady, well-ventilated spot for several weeks to ensure it will last for months.
Garlic: Quick Facts Table
| Key Factor | Details |
| Sunlight | Full Sun (6-8+ hours of direct sunlight per day) |
| Soil Type | Rich, well-drained, loose soil (sandy loam is ideal) |
| Soil pH | 6.0 to 7.0 (Slightly acidic to neutral) |
| Planting Depth | 2 to 3 inches (5-7.5 cm) |
| Spacing | 4 to 6 inches between cloves, 12 inches between rows |
| Sprouting Time | Emerge from soil in early spring following fall planting |
| Days to Harvest | Approximately 9 months from fall planting (harvested mid-summer) |
When to Plant Garlic
The simple rule is this: plant garlic in the fall, about 4 to 6 weeks before your first expected fall frost.
This timing is a careful balance—it’s long enough for the plant to grow a strong root system and sprout 5-6 leaves before the ground freezes, which I’ve found is the ideal size for winter survival.
Unlike the spring-sown vegetables you might be used to, garlic uses the winter cold to its advantage. This period of cold is what triggers a single clove to divide and form a full head of garlic.
Garlic Planting Calendar (USDA Zones 4-9)
How to Read This Calendar
The calendar below provides key planting dates based on two strategies: Safe (to minimize risk) and Aggressive (to maximize your growing window).
- For Fall Planting, the goal is to establish strong roots before winter. The ‘Safe’ date provides the longest time for root growth. The ‘Aggressive’ date pushes the planting window to its limit, risking insufficient root development if an early freeze occurs.
- For Spring Planting, the ‘Aggressive’ date is earlier, risking a late frost for the longest possible growing season. The ‘Safe’ date is later, after most frost danger has passed.
Garlic-Specific Timing Rules
Fall Planting: (Recommended Method) These dates are for planting individual garlic cloves. They are set 4 to 6 weeks before your average first fall frost date. This timing is critical: it allows the cloves to establish a robust root system before the ground freezes and ensures they receive the necessary winter cold (vernalization).
This cold period is what triggers a single clove to develop into a full, multi-cloved bulb, making fall planting the essential method for a large summer harvest.
Spring Planting: (Alternative Method) While fall planting is strongly recommended, spring planting is an option if you missed the window. These dates are for planting cloves as early as the ground is workable.
The timing varies by climate: in colder zones (4-6), dates are set 2 to 4 weeks before the last spring frost. In milder zones (7-9), the window is wider, set 4 to 8 weeks before the last frost. Be aware that spring-planted garlic will result in significantly smaller bulbs that may not divide.
| USDA Zone | Spring Planting(Aggressive) | Spring Planting(Safe) | Fall Planting(Aggressive) | Fall Planting(Safe) |
| Zone 4 | Apr 11 – Apr 25 | Apr 17 – May 1 | Aug 19 – Sep 2 | Aug 14 – Aug 28 |
| Zone 5 | Apr 2 – Apr 16 | Apr 9 – Apr 23 | Aug 28 – Sep 11 | Aug 22 – Sep 5 |
| Zone 6 | Mar 30 – Apr 13 | Apr 10 – Apr 24 | Sep 6 – Sep 20 | Aug 21 – Sep 4 |
| Zone 7 | Feb 9 – Mar 9 | Feb 11 – Mar 11 | Sep 24 – Oct 8 | Sep 13 – Sep 27 |
| Zone 8 | Jan 26 – Feb 23 | Feb 8 – Mar 8 | Sep 28 – Oct 12 | Sep 18 – Oct 2 |
| Zone 9 | Jan 3 – Jan 31 | Jan 21 – Feb 18 | Oct 19 – Nov 2 | Sep 29 – Oct 13 |
✔ Accuracy is my priority. The key planting dates in this calendar are calculated based on representative Aggressive and Safe frost date baselines established for each zone. Because your garden’s microclimate may vary, I strongly recommend that you verify your local frost dates for the most accurate timing. Learn My Methodology & Find a Frost Date Tool Here.
Want to Plan Your Entire Garden Year?
The table above gives you the perfect planting window for garlic. But what about everything else?
To see how garlic fits into your entire year’s schedule alongside 60+ other vegetables, herbs, and fruits, check out my complete, year-round planting calendar designed specifically for your zone.
Find Your Zone’s Complete Planting Calendar:
Zone 4 Planting Calendar | Zone 5 Planting Calendar | Zone 6 Planting Calendar | Zone 7 Planting Calendar | Zone 8 Planting Calendar | Zone 9 Planting Calendar
Understanding the Planting Windows
Fall Planting: The Key to Success
Garlic follows a “fall-plant, summer-harvest” schedule. By planting in the autumn, you give the clove several weeks to establish a robust root system while the soil is still relatively warm. The clove then goes dormant through the coldest parts of winter.
Once spring arrives, it is perfectly positioned to burst forth with green growth, fueled by its established roots. This head start is essential for growing large, healthy bulbs.
Getting this timing right is crucial. From my experience, if I plant too early, the garlic produces too much soft, leafy growth that is easily damaged by the harsh winter, wasting the plant’s precious energy. If I plant too late, the clove won’t have enough time to establish the strong roots needed to endure the freeze, often resulting in weaker plants or cloves that rot.
That 4-to-6-week window truly is the sweet spot for a successful harvest.
However, for gardeners in very cold climates (USDA Zone 4 or colder), some experts, like those at the University of Minnesota, recommend a different strategy: plant one to two weeks after the first killing frost. This timing uses the cold air to prevent excessive top growth that could be damaged by a harsh winter, while the still-warm soil allows for robust root development. This approach minimizes risk in regions with severe winters.
The Magic of Winter: How Cold Creates a Better Bulb (Vernalization)
This is the most important “why” in garlic growing. For a single planted clove to differentiate into a head with multiple cloves, it needs to experience a prolonged period of cold. This biological process is called vernalization.
Without several weeks of cold temperatures (typically below 40°F / 4°C), the clove won’t divide properly. It will simply grow into one large, round, undivided bulb known as a “solo” or “round” garlic. It’s still edible, but it’s not the goal! Winter isn’t the enemy; for garlic, it’s a necessary friend.
What About Spring Planting?
While you technically can plant garlic in the spring as soon as the soil is workable, I generally don’t recommend it for beginners seeking a classic harvest.
Because the cloves miss out on the long, cold vernalization period, spring-planted garlic often fails to form a divided bulb and will be much smaller than its fall-planted counterpart. If you live in a very cold climate (Zone 3 or colder) where the ground freezes too early, spring planting may be your only option, but you should choose varieties specifically adapted for it.
Key Factors & Advanced Strategies
The Secret Signal: Ideal Soil and Air Temperatures
- For Germination (Root Growth): Garlic will begin to grow roots when the soil temperature is between 40°F and 60°F (4°C and 15°C). This is why the 4-6 week window before a hard frost is so perfect—it allows for root development before the deep freeze sets in.
- For Optimal Growth (Bulb Formation): In the spring and summer, garlic focuses on bulb development. The ideal air temperature for this phase is around 60°F to 75°F (16°C to 24°C).
Pro Technique: Variety Staggering
Succession planting, where you plant a new batch every few weeks, doesn’t work for garlic due to its long, single-season growth cycle.
However, you can achieve a longer harvest window by planting several different varieties. Some cultivars mature earlier or later than others, allowing you to spread out your harvest over several weeks in the summer.
Winter Survival Strategies for Cold Climates
For gardeners in colder zones (like Zone 4 or 5), a couple of extra steps are key to ensuring your garlic makes it to spring.
- Apply a Thick Winter Mulch: This is the most important thing you can do. Once the ground has cooled but before it freezes solid, cover your garlic bed with 4 to 6 inches of loose straw, shredded leaves, or grass clippings. This acts like a winter blanket, insulating the soil, protecting the cloves from extreme temperature fluctuations, and preventing them from being heaved out of the ground by frost cycles.
- Provide a Final “Overwintering” Watering: If you’ve had a dry autumn, I highly recommend giving the garlic bed one last deep watering just before the ground is expected to freeze solid. This ensures the roots have adequate moisture to endure the long, dry winter air, which helps prevent the cloves from dehydrating.
How to Plant, Grow, and Harvest Garlic: A Step-by-Step Guide
Follow these steps chronologically, and you’ll be on your way to a fantastic garlic harvest.
Total Time 3 hours and 30 minutes
Step 1: Choose the Right Variety
This is the most important decision you’ll make. Garlic isn’t just garlic; it comes in two main types, and your climate dictates which is best for you.
Hardneck Garlic (Allium sativum var. ophioscorodon):
Best For: Colder climates (USDA Zones 6 and below). It is extremely winter-hardy.
Characteristics: It has a rigid central stalk (the “hard neck”) that grows up from the bulb. In early summer, it produces a delicious, edible flower stalk called a “scape.” The cloves are generally larger and more uniform but fewer in number per bulb. Flavors are often more complex and pungent.
Storage: Shorter storage life, typically 4-6 months.
Softneck Garlic (Allium sativum var. sativum):
Best For: Milder climates (USDA Zones 7 and above). It is less tolerant of extreme winter cold.
Characteristics: The stem is soft and flexible all the way down to the bulb, which is why it’s the type used for making garlic braids. It does not produce a scape. The bulbs contain many more cloves of varying sizes. This is the common type you find in most grocery stores.
Storage: Excellent storage life, often lasting 9-12 months.
My Advice: Sourcing and Selecting the Best Cloves
For the best results, I always recommend starting with certified “seed garlic” from a reputable nursery or online supplier. This ensures the variety is suited for growing in a home garden and is disease-free. While you can try planting cloves from a grocery store, they are often treated to prevent sprouting and may not be a variety that will perform well in your climate.
Once you have your seed garlic, quality selection is the key to a great harvest. Here’s what I look for:
1. Size Matters: A simple rule I always follow is that a bigger clove will produce a bigger bulb. I always set aside my largest and healthiest cloves for planting and use the smaller ones in my kitchen. The larger clove contains more food energy to fuel a strong start.
2. Inspect for Health: Only plant cloves that are firm, plump, and free from any signs of disease, mold, or physical damage. Discard any that feel soft or look discolored. A healthy start is crucial for a healthy plant.
Step 2: Prepare the Perfect Soil and Location
Garlic is not overly demanding, but I’ve found that dedicating a little time to preparing its home will pay huge dividends in the size and health of the bulbs.
Location:
Sunlight: Choose the sunniest spot in your garden. At least 6-8 hours of direct sunlight is essential for fueling bulb formation.
Crop Rotation: I make it a strict rule never to plant garlic where other onion-family crops (like onions, leeks, or shallots) have grown in the last three to four years. A four-year rotation is highly recommended by institutions like the University of Minnesota to effectively break disease cycles. This is one of the most important preventative steps you can take.
Soil Preparation:
Garlic thrives in loose, fertile soil with excellent drainage—it absolutely hates sitting in waterlogged ground. My goal is to create a rich and fluffy bed for the roots to grow freely and the bulbs to expand without resistance.
1. Loosen the Soil: I start by loosening the soil to a depth of at least 8 to 12 inches (20-30 cm). This breaks up any compacted layers, which is crucial for good drainage and for giving the bulb room to swell.
2. Amend Generously: Next, I add a generous 2 to 3-inch layer of high-quality, well-rotted organic matter. My preference is always for compost or aged manure. This is because organic matter not only provides the main nutrients (NPK) but also all the essential micronutrients that many chemical fertilizers lack, leading to healthier plants and better-tasting garlic.
3. Incorporate and Mix Well: This is a critical point that many beginners miss. I make sure to thoroughly mix the compost and any other granular organic fertilizers into the entire planting area.
Never place a garlic clove directly on top of a concentrated pocket of fertilizer, as this will severely burn the new roots. The nutrients must be evenly distributed throughout the soil for the plant to use them safely.
If you have heavy clay soil, I strongly recommend growing garlic in a raised bed, where you have complete control over creating this ideal soil mix.
Step 3: Planting the Cloves
With your soil perfectly prepared, it’s time for the most exciting part—planting the cloves that will become your future harvest.
1. Optional Pro-Tip: Soak the Cloves.
Here’s a trick I’ve personally found gives my garlic a head start, though it’s not a standard step in most university guides. About 8-10 hours before I plan to plant, I soak the cloves in a bowl of room temperature water. This simple step helps to ‘wake them up’ from dormancy and encourages faster rooting once they are in the ground.
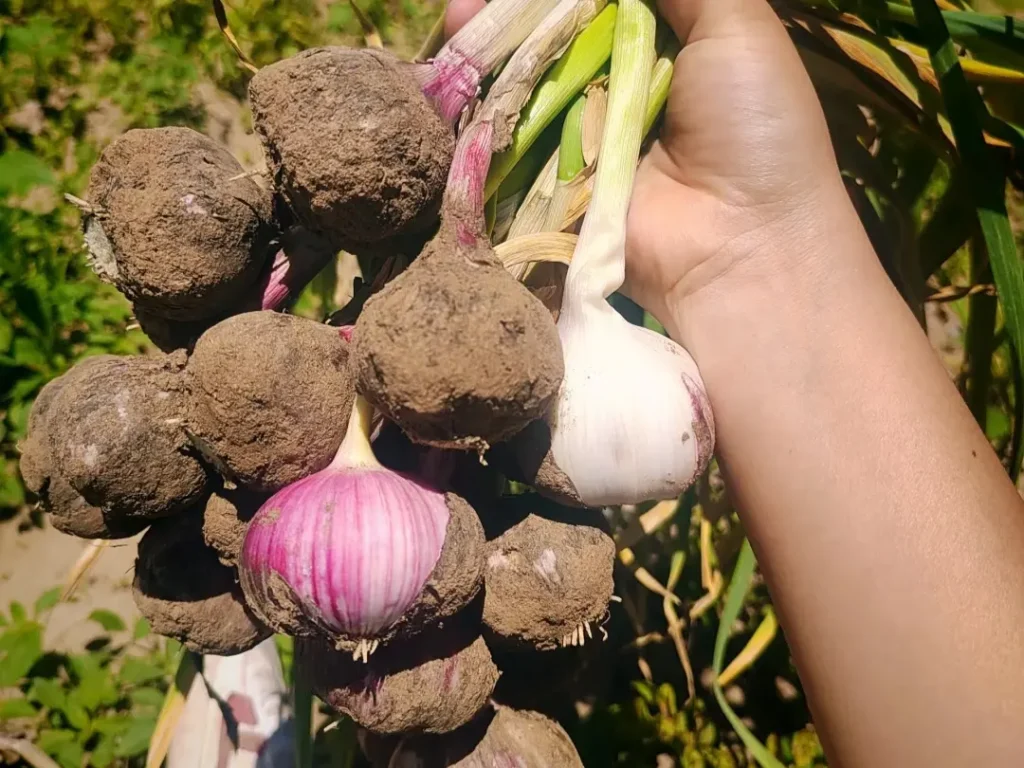
2. Break the Bulb.
Just before you’re ready to plant, gently break apart your seed garlic bulbs into individual cloves. It’s important to leave the papery wrapper on each clove, as this skin provides a layer of protection in the soil.
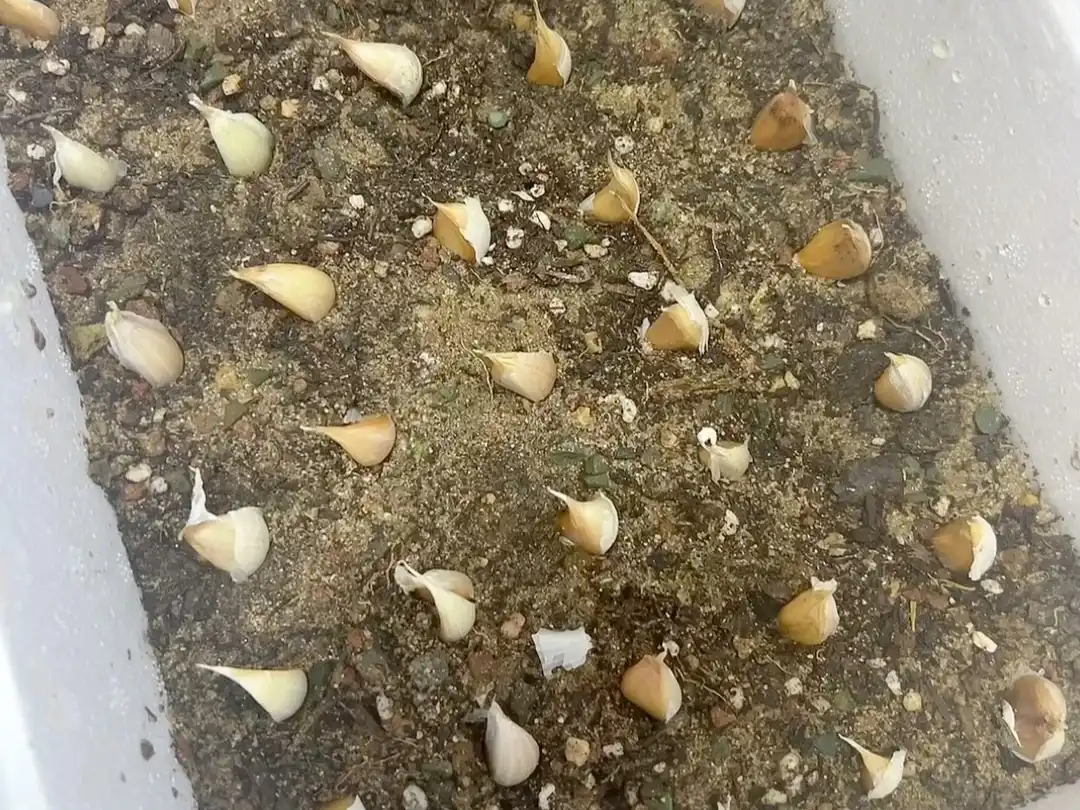
3. Plant Pointy-End Up.
This is one of the most critical rules of garlic planting. You must plant each clove with its flat, root-end facing down and the sharp, pointy-end facing up. The green shoot will emerge from that point.
4. Get the Depth Right.
I plant each clove so the tip is about 2 to 3 inches (5-7.5 cm) below the soil surface.
There’s an old gardening saying, “plant onions deep, plant garlic shallow,” and it’s absolutely true. If you plant garlic too deep, the bulb has to fight against the pressure of the soil above it as it tries to expand, which can result in smaller bulbs. This 2-to-3-inch depth is the perfect sweet spot.
5. Space Them Out.
Proper spacing is key to getting the bulb size you want. There are two main approaches I recommend, depending on your goals:
a. The Standard Method (For Larger Bulbs):
This is the most straightforward way to ensure each bulb has ample room to grow to its maximum size and to promote good air circulation. For this method, I press each clove into the soil, spacing them 4 to 6 inches apart. If planting in rows, I recommend spacing the rows about 12 inches apart.
b. Advanced Strategy: High-Density Planting (For Maximizing Harvest):
For gardeners looking to get the most out of a small space, you can adopt a high-density approach recommended by institutions like Utah State University. This involves planting cloves much closer, at 3 to 4 inches apart in rows spaced only 6 to 10 inches apart. This method can significantly increase your yield per square foot, though it may require more diligent watering and feeding.
Another efficient technique is the bed system, where you plant “double rows” (two rows spaced 6 inches apart from each other) on a wide garden bed, which maximizes growing space while leaving wider paths for access.
6. Water Them In.
Once all your cloves are planted, give the bed a thorough but gentle watering. This is an important final step that settles the soil around the cloves, eliminates any air pockets, and provides the immediate moisture they need to start developing roots.
Step 4: Early Spring Care: Weeding and Mulching
As winter fades and the days grow longer, you’ll be rewarded with the sight of bright green garlic shoots poking through the soil. This is a critical time to care for your young plants to ensure they grow into a strong and healthy crop.
Because you planted individual cloves at their final spacing, there’s no need to thin them out as you would with many other vegetables sown from seed.
Instead, your two main jobs in early spring are weeding and mulching:
1. Keep it Weed-Free.
I can’t stress this enough: garlic has a shallow root system and does not compete well with weeds for water and nutrients. It’s crucial to keep the bed meticulously weed-free, especially when the plants are young. I gently remove any competing weeds by hand or with a hoe as soon as they appear.
2. Gently Loosen the Soil.
After a heavy rain, the soil surface can sometimes form a hard crust. I like to gently scratch the top inch of soil with a hand cultivator or fork to break it up. This practice, often called “cultivating,” is excellent for improving air and water penetration to the roots.
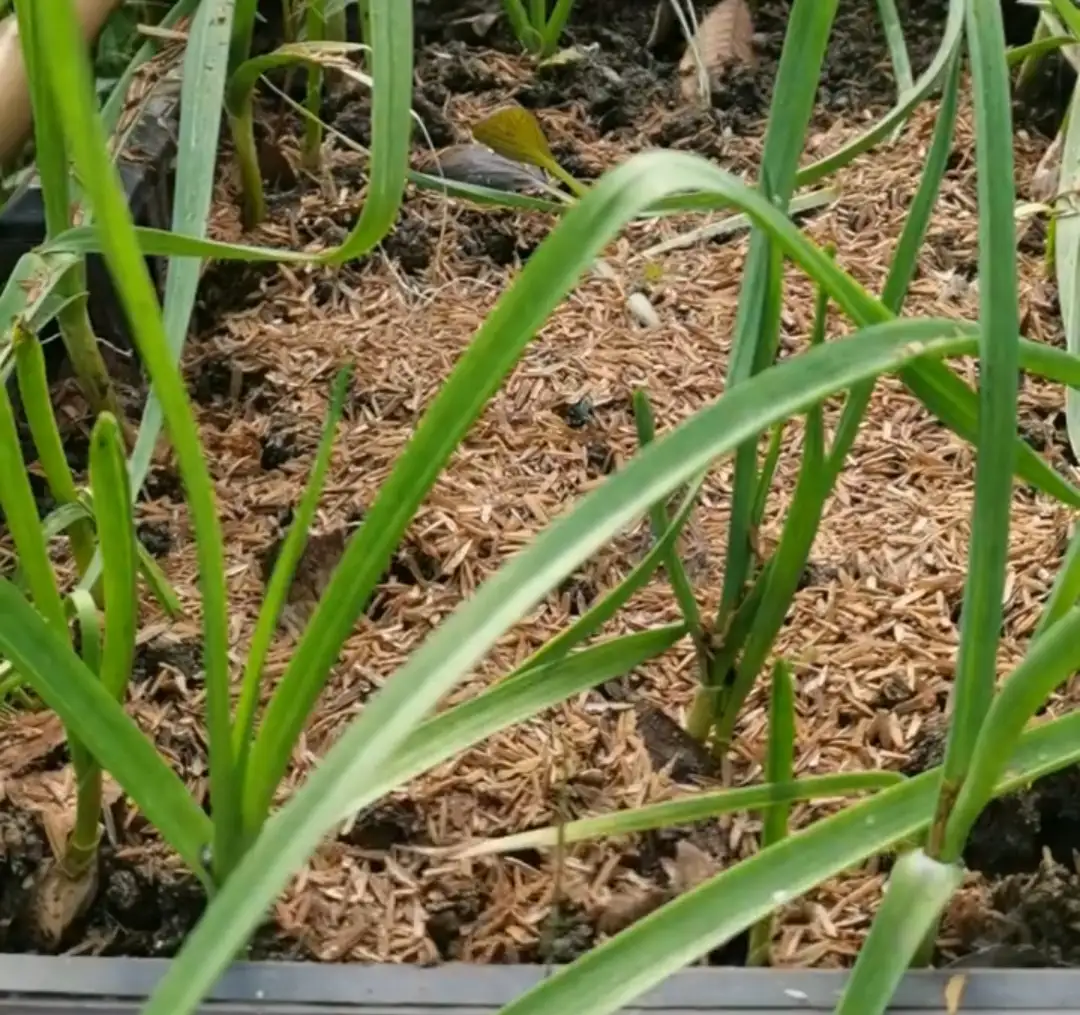
3. Apply a Generous Mulch.
Once the shoots are a few inches tall and the area is free of weeds, I apply a 2 to 3-inch layer of organic mulch, like straw or shredded leaves, around the plants. A good layer of mulch will suppress future weeds, retain precious soil moisture so you have to water less, and help regulate the soil temperature.
For details on the ongoing tasks of watering and feeding your established garlic plants throughout the growing season, please see the “Expert Guide” section below.
Step 5: An Early Bonus: Harvesting Garlic Scapes
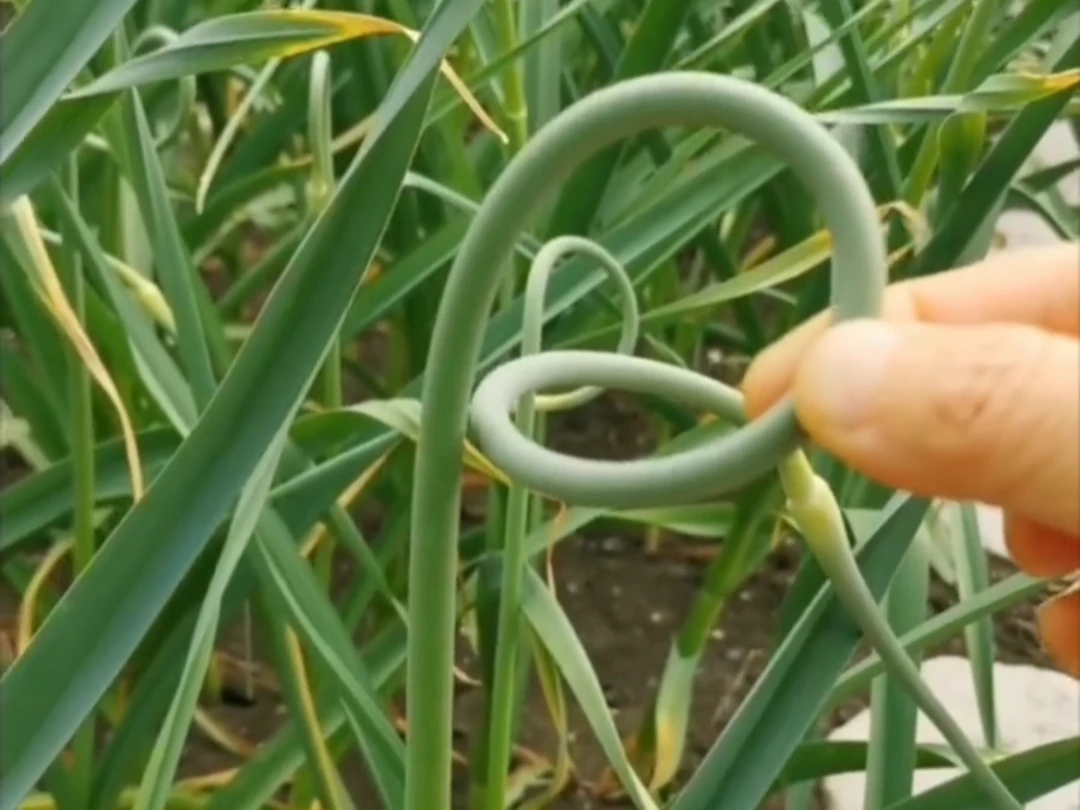
If you planted a Hardneck variety, you’re in for a treat in late spring or early summer. You’ll see a round, curling stalk emerge from the center of the plant—this is the garlic scape, a delicious bonus harvest.
Why It’s Important:
Removing the scape is a crucial step. It redirects the plant’s energy away from producing a flower and focuses all its resources back down into growing a bigger, more robust bulb. Plus, scapes are incredibly tasty and a great preview of the garlic to come!
When and How to Harvest Scapes:
Timing is key for the best texture. The perfect time to harvest is when the scape has grown well above the top leaves and has formed one or two distinct curls, often looking like a little “hook.” If you let it grow much longer, it can become tough and woody.
Here are a couple of my personal tips for a perfect scape harvest:
1. Harvest in the Afternoon:
I always try to harvest scapes on a warm, sunny afternoon. At this time of day, the plant is a little less full of water, which makes the scape more flexible and far less likely to snap when you handle it.
2. Make a Clean Cut:
Using a pair of clean scissors or snips, cut the scape off as low as you can without damaging the plant’s top leaves.
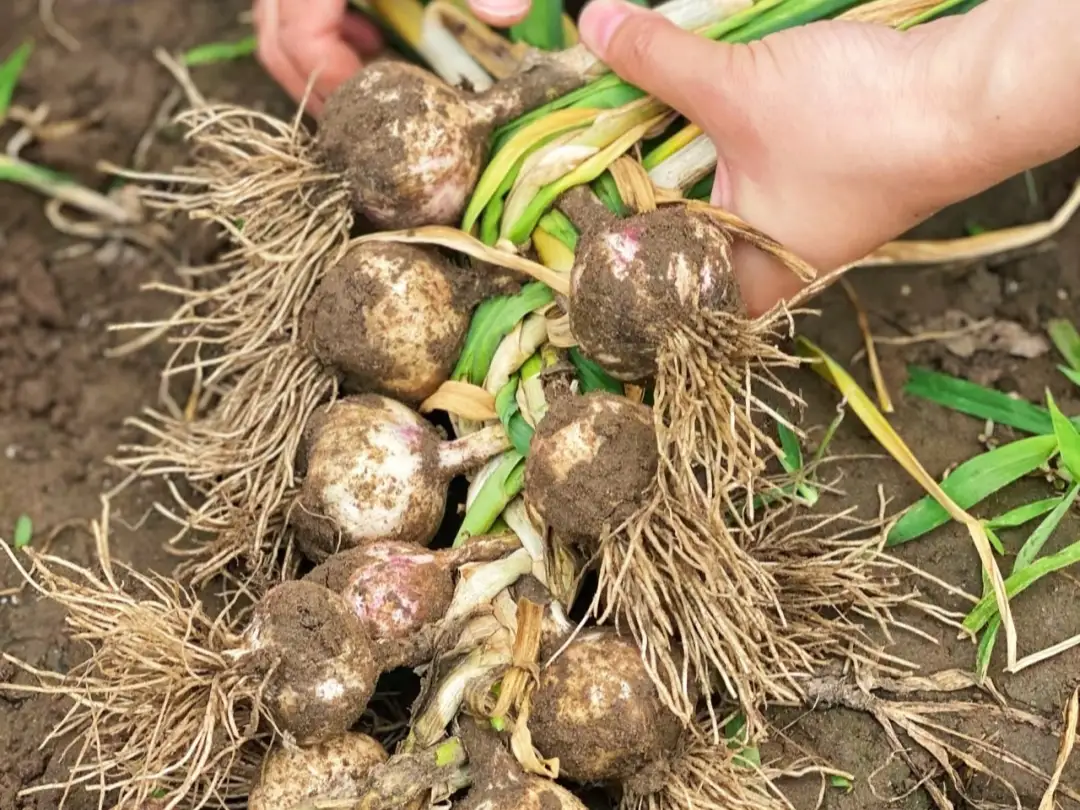
Step 6: Harvesting the Bulbs for Peak Flavor

After months of patience, the big moment has arrived. Harvesting your garlic at the right time is the key to getting flavorful bulbs that will store well for months to come.
When to Harvest:
Don’t just watch the calendar; watch the plant. For Hardneck varieties, a good rule of thumb is that they are ready about 18-20 days after you’ve harvested the scapes. However, the most reliable signal for both Hardneck and Softneck types is always the leaves.
I start checking my plants closely once the lower third of the leaves have turned yellow and brown. The perfect time to harvest is when the top portion of the plant still has plenty of green.
A good rule of thumb is to harvest when there are still about 5-6 green leaves on top, or, as the University of Minnesota suggests, when about half of the leaves are still green. Another sign I look for is a softening of the “neck” or the base of the stem.
If you wait too long and all the leaves turn brown, the protective wrappers around the bulb will start to disintegrate in the soil, causing the head to “shatter” upon harvest and store poorly.
How to Harvest:
1. Pro-Tip: Water Lightly Beforehand.
If your soil is very hard and dry, I’ve found it helpful to give the bed a light watering the day before you plan to harvest. This softens the ground just enough to make lifting the bulbs much easier and prevents breaking their necks.
2. Loosen the Soil First.
I can’t say this enough: never try to pull your garlic straight out of the ground like a carrot! You will almost certainly snap the stem off. Instead, use a garden fork or a small trowel to carefully loosen the soil around and underneath the bulb.
3. Gently Lift.
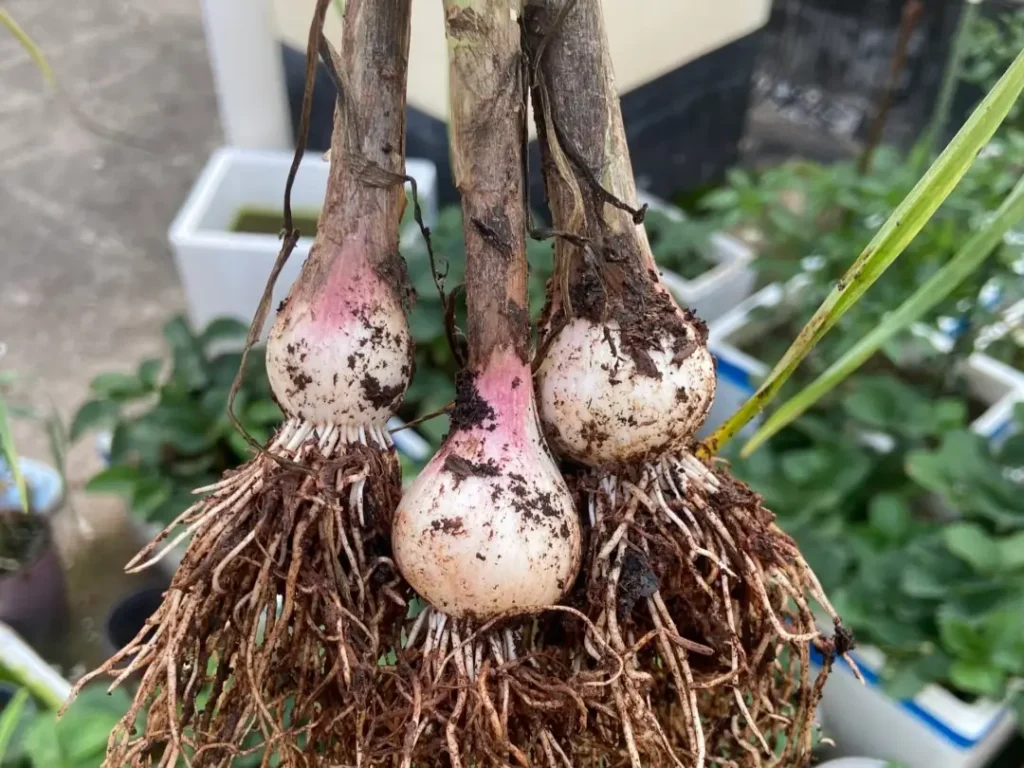
Once the soil is loose, you can gently lift the bulb from the ground. Be careful not to bruise it during this process, as any damage can lead to rot in storage.
4. Protect the Bulbs from Sunburn.
This is a critical step that many gardeners overlook. Freshly harvested garlic bulbs are very sensitive and can get sun-scalded or turn green if exposed to direct sunlight, which ruins their storage quality.
As I pull them from the ground, I gently brush off any large clumps of dirt (I never wash them). If they need to air-dry in the field for a few hours, I always follow the rule: sun the leaves, not the bulb. I carefully lay the plants in rows so that the green tops of one row completely cover and shade the sensitive bulbs of the row next to it. This protects them from any damage before I move them to a fully shaded area for curing.
Step 7: Curing and Storing Your Garlic
This final step is absolutely essential if you want your garlic to last for months. Curing is the slow drying process that allows the bulb’s skin to form a protective barrier. A little patience here goes a long way.
1. Prepare for Curing:
Immediately after harvesting, move your garlic (with stems and roots still attached) out of the sun and into a warm, dry, shady, and well-ventilated location. A covered porch, a garage, or a airy shed works perfectly.
2. Arrange for Airflow:
Good air circulation all around each bulb is the key to preventing mold and ensuring even drying. You have two classic options:
a. Hanging: I like to tie the garlic plants into bundles of 5-10 and hang them from rafters or hooks.
b. Racks: You can also lay the garlic in a single layer on wire racks or screens that allow air to circulate from below.
3. Be Patient:
Let the garlic cure undisturbed until it is perfectly dry. The exact time this takes can vary depending on your climate’s humidity; it may take 3 to 4 weeks in more humid areas, as suggested by the University of Minnesota, or as little as 1 to 2 weeks in drier climates, according to Utah State University.
You’ll know the process is complete when the outer wrappers are papery and crisp, the roots are completely shriveled and dry, and the spot where the stalk meets the bulb (the “neck”) is constricted, hard, and totally dry when you pinch it.
4. Prep for Storage:
Once the garlic is fully cured, it’s time for its final haircut.
a. For Loose Bulbs: If you cured your garlic on racks or want to store them as individual bulbs, simply trim the dried roots off with scissors and cut the stalks to about an inch above the bulb.
b. For Garlic Braids (Softneck Only): If you grew Softneck garlic, this is your chance to make a beautiful and traditional garlic braid! While the leaves are dry but still a little pliable, you can braid the tops together just like hair, adding a new bulb at each crossover. Once finished, you can simply hang the entire braid in your kitchen or pantry.
5. Store Correctly:
Store your finished bulbs or braids in a cool, dark, dry place with good airflow. An ideal temperature is around 60°F (15°C), but the key is consistency and good airflow. A pantry, cellar, or cool closet is perfect.
Avoid storing garlic in the refrigerator (it’s too humid and can cause sprouting) or in sealed plastic bags.
Expert Guide to a Healthy Harvest: Tips & Troubleshooting
Ongoing Care: Mastering Watering, Feeding, and Mulching
Once your garlic is established in the spring, a consistent care routine will make the difference between a good harvest and a great one.
I think of the garlic plant’s life in distinct phases, and I tailor my watering and feeding strategy to match each phase.
Watering
My goal is to keep the soil consistently moist—like a well-wrung-out sponge—but never waterlogged. The watering frequency changes based on the plant’s growth stage:
- Spring Leaf Growth Phase: From when the shoots emerge until the scape begins to form, the plant is focused on growing lush leaves. I water deeply about once a week if there hasn’t been a good rain, checking to make sure the top inch of soil is dry first.
- Scape Development Phase: From the moment you first spot the scape emerging until you harvest it, the plant is working its hardest and is at its thirstiest. I monitor the soil closely during this time and water consistently to keep it evenly moist, often every 4-7 days if there’s no rain. I do, however, stop watering about 3-4 days before I plan to cut the scapes, as I’ve found this makes them a bit less brittle.
- Bulb Swell Phase: This period, right after I harvest the scapes, is when the plant redirects all its energy downward. I give the bed a good watering immediately after collecting the scapes to encourage the bulbs to swell. I then keep the soil evenly moist for the next few weeks.
- Hardening Off Phase (The Final Weeks): I stop watering completely about two weeks before I plan to harvest the bulbs. This is a crucial step that signals the plant to harden off, which is essential for long-term storage.
Pro-Tip for Flavor: I’ve noticed that allowing the soil to dry out a bit more between waterings in the final month can slightly stress the plant, which encourages it to produce more allicin. This can lead to a spicier, more pungent, and more flavorful garlic bulb!
Feeding
Garlic is a heavy feeder, and I follow a “base feed is primary, top-dressing is secondary” philosophy. The spring feeding schedule is tied directly to the plant’s milestones.
- Fall Feeding (Optional, for Cold Climates): To give my garlic a nutrient reserve for winter, I sometimes apply a light top-dressing of compost in the late fall. It’s very important to use a balanced organic fertilizer and avoid high-nitrogen fertilizers at this time. Too much nitrogen encourages soft green growth that is easily damaged by the cold, which reduces the plant’s winter hardiness.
- Spring Feeding (The Main Boost): This is where top-dressing makes a huge impact. Rather than a rigid schedule, I feed based on the plant’s growth stage:
- First Feeding (Seedling Boost): Once the shoots are about 6 inches tall and growing strongly, I give them their first meal. This “seedling boost” of a nitrogen-rich organic liquid fertilizer (like fish emulsion) encourages vigorous leaf growth, which will power the plant later on.
- Second Feeding (Scape Boost): The most critical feeding, in my opinion, comes about a month later. This “scape boost” happens just as the plant is preparing to send up its scape (for Hardnecks) or entering its most rapid growth phase (for Softnecks). I apply another dose of balanced liquid fertilizer to provide the energy needed for both scape production and the initial stages of bulb formation.
- Final Feeding (Bulb Swell): While it can be tempting to feed the plant after harvesting the scapes, it’s absolutely critical to cease all nitrogen-heavy feeding well before the final bulb harvest. As a firm guideline, the University of Minnesota advises gardeners to avoid applying nitrogen after the first week of May. This signals the plant to stop focusing on leaf growth and instead redirect all its energy downward into bulb formation. This step is essential for developing large, well-formed heads that will store properly.
Mulching
As I mentioned in Step 4, a 2 to 3-inch layer of organic mulch (like straw or shredded leaves) applied in the spring is your best friend. It suppresses weeds, conserves soil moisture, and prevents the soil surface from forming a hard crust. I check it mid-season and top it up if it has decomposed significantly.
Natural Pest and Disease Control
One of the joys of growing garlic is that it naturally repels many common garden pests. However, staying vigilant is key to a healthy crop. My approach is always focused on prevention first, which is far more effective than trying to cure a problem later.
Prevention is the Best Medicine
- Crop Rotation: This is my number one rule. Never plant garlic or other alliums (onions, leeks) in the same spot more than once every three to four years. This is the single most effective way to prevent the buildup of soil-borne diseases like white rot, and a full four-year break is considered the gold standard.
- Excellent Sanitation: After the final harvest, I always make sure to clear all garlic debris, including leaves and stems, from the garden bed. This removes any places where pests and fungal spores might try to overwinter.
- Use Well-Rotted Compost: To avoid attracting pests like the destructive onion root maggot, I only use fully composted, well-rotted manure in my soil preparation. Raw or partially composted manure can be a magnet for the flies that lay these maggots.
- Promote Airflow: As I noted in the planting steps, proper spacing is crucial. Good air circulation helps the leaves dry quickly after rain, which is the best defense against fungal diseases like rust.
Common Pests and How I Handle Them
- Onion Root Maggots (Garlic Maggots): These are the most common issue. Prevention by avoiding raw manure is key. Some old-time gardeners also swear by sprinkling a light dusting of wood ash around the base of the plants in spring, which may help deter the egg-laying flies.
- Thrips and Aphids: These tiny insects can sometimes suck the juices from the leaves, causing stippling or discoloration. I often place yellow sticky traps near my garlic patch to monitor for and capture them. If an infestation starts, a strong spray of water from the hose or an application of insecticidal soap is usually enough to handle it.
- Bulb Mites: These are microscopic arachnids that can infest bulbs, causing them to decay in storage. The best defense is prevention: always plant clean, certified seed garlic, and ensure your harvested bulbs are cured and stored properly in a place with low humidity to discourage their growth.
- Aster Leafhoppers: While less common for home gardeners, these insects can transmit a disease called Aster Yellows, which may cause leaves to yellow and plants to become stunted. The most effective way to manage them is to keep the garden and surrounding areas free of weeds, which serve as their habitat.
Common Diseases
- Fungal Leaf Diseases (Rust, Leaf Blight): You might see various spots or pustules on the leaves, like the orange ones from Rust or brown/tan lesions from Leaf Blight. While they look alarming, they are often cosmetic if they appear late in the season. The best prevention is the same for all fungal leaf issues: ensure excellent air circulation through proper spacing, and try to water the soil at the base of the plant, not the leaves themselves.
- Rot Diseases (White Rot, Soft Rot, Neck Rot): These are more serious as they affect the bulb itself.
- White Rot is a devastating soil-borne fungus that requires strict crop rotation to prevent. You’ll see a white, fluffy growth at the base of the bulb.
- Bacterial Soft Rot can cause the neck of the garlic to become mushy and foul-smelling, especially after harvest.
- Neck Rot is another fungal issue that often appears during storage, causing the neck of the bulb to soften and decay from the top down.
- The best prevention for all rots is to ensure your soil is very well-drained, to be extremely careful not to bruise the bulbs during harvest, and to cure them perfectly in a place with good airflow.
Solving Common Problems with Garlic
Even with the best care, you might encounter a few head-scratchers along the way. Here are some of the common problems I’ve seen, their likely causes, and how to fix or prevent them.
Problem: My garlic leaves are turning yellow.
This depends entirely on when it happens. Yellowing of the lower one or two leaves in mid-summer is a completely normal sign that the plant is maturing and diverting its energy to the bulb. Harvest is near! However, if the upper leaves are turning yellow early in the spring, it’s a sign of stress—most often a lack of nitrogen or a case of overwatering in poorly drained soil.
Solution: Assess your watering schedule to ensure the soil isn’t waterlogged. If the soil moisture seems right, the issue is likely a nutrient deficiency. Provide a dose of nitrogen-rich liquid fertilizer to help the plant recover. (You can find my detailed watering and feeding recommendations in the “Ongoing Care” section of the Expert Guide above).
Problem: My cloves never sprouted in the spring.
There are a few likely culprits. First, the soil may have been too dry after you planted in the fall, preventing roots from ever forming. Second, your seed garlic itself might have been old or of poor quality. Finally, a very warm fall followed by a mild winter might not provide a long enough cold period to fully break the clove’s dormancy.
Solution: This is best addressed with prevention for next year’s crop. Ensure you are starting with high-quality seed garlic (as detailed in Step 1) and are giving the bed a thorough watering immediately after planting (as mentioned at the end of Step 3).
Problem: My plant grew lots of green leaves, but the harvested bulb was tiny.
This is almost always a sign of planting too deep. As I mentioned in the planting steps, garlic needs to be planted shallowly. If a clove is buried too deep, it spends all its energy pushing leaves up through the soil and doesn’t have enough left for bulb formation. The pressure of the dense soil above it can also physically restrict the bulb’s ability to swell.
Solution: The key is prevention. Next season, be sure to follow the depth guidelines in Step 3 of our step-by-step guide, planting your cloves at the correct depth. If you realize this mid-season, you could try to very gently brush away some of the topsoil to reduce the depth, but the best solution is to get the planting depth right from the start.
Problem: My harvested garlic bulb split open or “shattered.”
This is a classic sign of harvesting too late. As garlic matures, the papery wrappers that hold the bulb together begin to naturally break down. If you leave the garlic in the ground for too long after the lower leaves have died back, these wrappers will disintegrate in the soil, and the bulb will simply fall apart when you try to lift it.
Solution: This is prevented by timely harvesting. Be sure to pull your garlic when the lower leaves have yellowed but there are still 5-6 green leaves on top. (You can review the specific visual cues in our guide to Step 6: Harvesting the Bulbs).