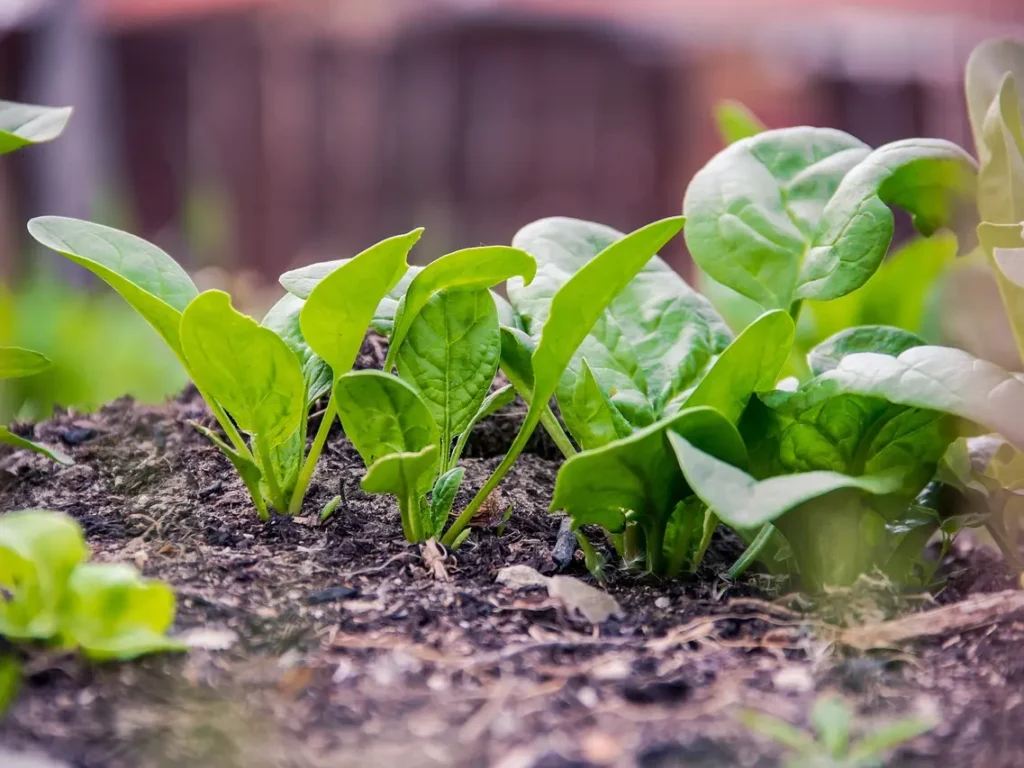
There’s a special kind of magic in harvesting fresh, tender spinach leaves right from your own garden—a flavor and crispness that you just can’t find in a plastic clamshell from the store.
I know that starting a new vegetable can feel like a big challenge, filled with questions and uncertainty. I’ve been there myself, staring at a packet of seeds and wondering where to even begin.
That’s why I’ve poured all my research into creating this guide. It’s your complete roadmap, designed to walk you through every single step with clarity and confidence. My promise to you is that by the time you finish reading, you’ll have all the knowledge you need to go from a tiny seed to a bountiful harvest.
This guide is just one part of my commitment to helping you succeed; for more, you can explore my complete library of Vegetable Growing Guides.
Key Takeaways (TL;DR)
- Plant in Cool Weather: Spinach thrives in cool temperatures and will “bolt” (go to seed and turn bitter) in the summer heat. Your primary planting windows are early spring and late summer for a fall crop.
- Consistent Water is Crucial: Keep the soil evenly moist at all times. Inconsistent watering is a major cause of stress, which leads to premature bolting and bitter-tasting leaves.
- Harvest “Cut-and-Come-Again” Style: For a long, continuous harvest from the same plants, only pick the outer, larger leaves and leave the small inner leaves to continue growing.
- Feed the Soil: Spinach is a heavy feeder that loves nutrient-rich soil. Amending your garden bed with plenty of compost before planting is the single best thing you can do for a healthy crop.
Spinach Quick Facts Table
| Factor | Details |
| Sunlight | Full Sun to Part Shade (prefers some afternoon shade in warmer zones) |
| Soil Type | Rich, loamy, well-draining |
| Soil pH | 6.5 – 7.5 (prefers neutral to slightly alkaline) |
| Spacing | 3-6 inches between plants |
| Days to Germination | 7-14 days |
| Days to Harvest | When outer leaves are 3-6 inches long |
| Planting Depth | 1/2 inch |
| Hardiness Zones | Best in USDA Zones 2-11 as a cool-season annual |
When to Plant Spinach
The best times to plant spinach are in early spring as soon as the soil can be worked, and again in late summer or early fall for a second harvest.
Spinach is a cool-season crop that grows best in the mild temperatures of spring and autumn. The goal is always to allow the plant to reach maturity before the daytime temperatures consistently rise above 75°F (24°C).
Success also heavily depends on matching the right type of spinach to the right season, a detail I’ll explain further below.
Spinach Planting Calendar (USDA Zones 4-9)
How to Read This Calendar
The calendar below provides key planting dates for two different gardening styles: Aggressive (to maximize your season) and Safe (to minimize frost risk). You’ll notice the ‘Aggressive’ fall dates start later—this is a deliberate strategy to extend the harvest as late as possible.
Spinach-Specific Timing Rules
Spring Dates: These dates are for direct sowing seeds into your garden. The timing is set 4 to 6 weeks before your average last frost date. This early start gives this cool-loving crop plenty of time to mature for a full harvest before the summer heat, which causes bolting, arrives.
Fall Dates: These dates are also for direct sowing. The window is set 6 to 8 weeks before your average first frost date. This allows the seeds to germinate quickly in warm soil while ensuring the plants mature during the cool days of autumn, which significantly sweetens their flavor.
| USDA Zone | Spring Planting(Aggressive) | Spring Planting(Safe) | Fall Planting(Aggressive) | Fall Planting(Safe) |
| Zone 4 | Mar 28 – Apr 11 | Apr 3 – Apr 17 | Aug 5 – Aug 19 | Jul 31 – Aug 14 |
| Zone 5 | Mar 19 – Apr 2 | Mar 26 – Apr 9 | Aug 14 – Aug 28 | Aug 8 – Aug 22 |
| Zone 6 | Mar 16 – Mar 30 | Mar 27 – Apr 10 | Aug 23 – Sep 6 | Aug 7 – Aug 21 |
| Zone 7 | Feb 23 – Mar 9 | Feb 25 – Mar 11 | Sep 10 – Sep 24 | Aug 30 – Sep 13 |
| Zone 8 | Feb 9 – Feb 23 | Feb 22 – Mar 8 | Sep 14 – Sep 28 | Sep 4 – Sep 18 |
| Zone 9 | Jan 17 – Jan 31 | Feb 4 – Feb 18 | Oct 5 – Oct 19 | Sep 15 – Sep 29 |
✔ Accuracy is my priority. The key planting dates in this calendar are calculated based on representative Aggressive and Safe frost date baselines established for each zone. Because your garden’s microclimate may vary, I strongly recommend that you verify your local frost dates for the most accurate timing. Learn My Methodology & Find a Frost Date Tool Here.
Understanding the Planting Windows
Spring Planting: Seizing the Cool Season
The goal of spring planting is simple: get your spinach seeds in the ground early enough so the plants can grow and mature before the intense heat of summer arrives.
Fall Planting: Your Second Harvest Opportunity
I think fall is the absolute best time to grow spinach. You sow the seeds in the warm soil of late summer, which encourages fast germination. Then, as the plants mature, the air temperatures are cooling down.
Even better, the cool weather and even a light frost during the mature stage will encourage the plant to concentrate sugars in its leaves, making the flavor exceptionally sweet.
The Danger Zone: Why Summer Heat is the Enemy
When spinach is exposed to long days and hot temperatures (consistently above 75°F or 24°C), it triggers a survival mechanism called bolting.
But the danger isn’t just the heat itself; it’s planting the wrong variety in the heat. If you plant a cold-hardy variety meant for fall (often spiny-seeded or savoy types) in the middle of summer, you will likely face germination failure, or the seedlings will bolt almost immediately, resulting in no harvest.
Key Factors & Advanced Strategies
The Secret Signal: Ideal Soil and Air Temperatures
While calendars are helpful, the most accurate signal to plant is the soil itself.
- Ideal Soil Temperature for Germination: While the university guides focus on planting when the soil is “workable,” in my personal experience, I’ve found that while seeds can sprout in soil as cool as 40°F (4°C), germination is fastest and most reliable when the soil temperature is between 60°F and 68°F (15°C to 20°C).
- Ideal Air Temperature for Growth: The plants thrive when daytime air temperatures are below 77°F (25°C). Once temperatures consistently exceed this, growth will slow significantly and the risk of bolting increases dramatically.
Pro Technique: Succession Planting
Instead of planting all your spinach at once, I highly recommend succession planting. This simply means sowing a new, small batch of seeds every 7 to 14 days throughout your planting window. This technique staggers your harvest, ensuring you have a continuous supply of fresh, perfectly-sized leaves instead of a massive glut all at once.
Extending Your Season: Getting an Earlier Start and Later Harvest
You can push the boundaries of the seasons with a few simple tools and techniques.
- Early Start: Use a cold frame or cover your garden bed with a row cover in late winter to warm the soil faster, allowing you to plant 1-2 weeks earlier.
- Pro Tip: Overcoming Warm Soil with Seed Priming: While some university guides suggest a simple 24-hour soak for slow-germinating varieties, I’ve found a more intensive priming method is a true game-changer for getting regular spinach to sprout reliably in very warm soil. Here’s my method:
- Soak the seeds in room temperature water for 12 hours.
- Drain the seeds and place them between moist paper towels inside a plastic bag. Put this in your refrigerator (around 40°F or 4°C) for 24 hours. This cold treatment helps break dormancy.
- Move the bag to a warmer spot (68-77°F or 20-25°C). Check daily.
- Once you see the tiny white root (radicle) emerge, they are ready to be carefully planted. This technique is a game-changer for summer/fall sowing but is not necessary for spring planting when the soil is naturally cool.
- Later Harvest: In late spring, you can use a shade cloth over your spinach bed to keep the plants cooler and delay bolting by a few precious weeks.
How to Plant, Grow, and Harvest Spinach: A Step-by-Step Guide
This is your chronological guide to success. Follow these steps, and you’ll be well on your way to a fantastic harvest.
Step 1: Choose the Right Variety
The first decision you make is one of the most important, as choosing the right seed for your specific season can be the difference between a frustrating experience and a bountiful harvest. While you’ll almost always see “bolt-resistant” on the package—which is crucial—let’s go deeper. I find it helpful to think about varieties in three distinct ways.
By Leaf Texture (The Culinary Choice)
This is what you’ll notice most in the kitchen.
- Savoy and Semi-Savoy: These have crinkly, deep green leaves. They look beautiful and have a wonderful crisp texture, but the crinkles can trap a bit of dirt, so they require more thorough washing.
- Smooth-leaf: These have flat, spade-shaped leaves that are exceptionally easy to clean. This is the type you most often find fresh in stores.
By Leaf Shape (The Heat/Cold Tolerance Indicator)
This is a key indicator of how a plant will perform in different temperatures.
- Round-leaf varieties are generally more heat-tolerant and slower to bolt. This makes them my primary choice for spring planting when the weather will be warming up.
- Pointed-leaf (arrow-shaped) varieties are typically more cold-hardy. They often grow vigorously in the cool temperatures of autumn and are excellent choices for fall crops.
By Seed Type (The Seasonal Specialist)
The seed itself tells a story about the plant’s ideal growing season.
- Smooth-seeded varieties are the modern standard for most spring and autumn plantings.
- Spiny-seeded varieties are an older type known for exceptional cold tolerance. They are the absolute best choice if you are planting in the fall with the goal of having the young plants survive the winter (overwintering) for an extra-early spring harvest.
What to do: Look at your seed packet and the variety description. First, decide on the leaf texture you prefer. Then, and most importantly, match the leaf shape and seed type to your planting season. For a primary spring crop, I look for a bolt-resistant, round-leaf, smooth-seeded variety. For a fall crop that I intend to overwinter, I would specifically seek out a cold-hardy, spiny-seeded variety.
Why it’s important: Matching the variety to your specific season and climate is your single best defense against the most common spinach problems, like premature bolting in the heat or poor growth in the cold. This simple step sets the entire foundation for success.
Step 2: Prepare the Perfect Soil and Location
Spinach sends down a surprisingly deep taproot, and the quality of your soil directly determines how strong that root system can become. Lush leaves above ground are a direct result of a healthy root system below, so I always dedicate extra attention to this step.
What to do:
- Choose the Right Spot: Find a location that receives full sun in the cool months of spring and fall. If you live in a warmer climate with intense sun, a spot with some light afternoon shade can be beneficial to help keep the soil cool.
- Loosen and Amend: Good preparation is key. To achieve the loose, airy soil that spinach loves, I always recommend digging down at least 8-12 inches (about 20-30 cm) and breaking up any large clumps of soil. Spinach thrives in loose, airy soil. Then, spread a generous 2-3 inch layer of high-quality compost or well-rotted manure over the surface and thoroughly mix it into the soil you’ve just loosened.
- A pro-tip from my own experience with challenging soils: if your soil is dense clay, adding some coarse sand or perlite to the mix can dramatically improve drainage and aeration.
- Final Rake and Rest: Rake the bed smooth and level. If you have time, I highly recommend letting the prepared bed sit exposed to the sun for a couple of days before planting. This bit of “sun-baking” can help reduce the number of weed seeds and potential pathogens near the surface.
Why it’s important: Taking the time to create a deep, loose, and fertile soil bed is the most impactful thing you can do for your spinach crop. It provides the essential nutrients for rapid leaf growth, ensures the roots can breathe and expand, and helps retain the consistent moisture that spinach desperately needs to avoid stress and bitterness.
Step 3: Sowing Seeds
Spinach grows best when sown directly into the garden, as its taproot doesn’t like to be disturbed. You have two main methods to choose from: broadcast sowing (scattering seeds over the surface) or row sowing. For easier weeding, thinning, and harvesting down the line, I strongly recommend row sowing.
What to do (Row Sowing Method):
- Create Your Rows: Use a stick or the corner of a hoe to draw shallow trenches about 1/2 inch (1-2 cm) deep in your prepared soil. I space my rows about 12-30 inches apart. This wider range, recommended by university growers, ensures excellent air circulation. For most typical home gardens, I find a spacing of 12-18 inches is perfectly sufficient.
- Sow the Seeds: Place your seeds in the trench, aiming to space them about 1 inch (2-3 cm) apart. Don’t stress about getting the spacing perfect—the goal here is to get an even stand of seedlings that we will thin out in the next step.
- Cover and Water: Gently brush the soil back over the seeds and lightly press down with your hand to ensure good seed-to-soil contact. Water the entire area thoroughly with a gentle shower from a watering can or hose, taking care not to dislodge the seeds.
My Go-To Technique for Warm-Weather Sowing
Sowing spinach in the heat of late summer presents a unique challenge that university guides don’t often cover in detail. The intense sun can quickly dry out and bake the soil surface, creating a hard crust that prevents seeds from sprouting. Here is my personal solution to combat this and ensure great germination:
After you’ve sown and watered your seeds, I cover the seeded area with a light, airy layer of straw or a piece of shade cloth suspended on hoops. This simple covering does three critical things: it shades the soil to keep it cool, dramatically slows down moisture evaporation, and prevents the soil from forming that hard crust.
You must check under the cover every single day. The moment you see the first green sprouts pushing through the soil, remove the cover immediately. This will give the new seedlings the direct sunlight they need to grow strong.
Why it’s important: Sowing at the correct depth with good soil contact gives your seeds the best chance to germinate. The special care taken during hot weather planting directly overcomes one of the biggest hurdles for establishing a fall crop, dramatically increasing your germination success rate.
Step 4: Thinning, Weeding, and Mulching for Strong Growth
This step is a critical transition. Once your seeds have sprouted, your goal is to create the perfect environment for each individual seedling to mature into a strong, productive plant. This involves three key actions performed in sequence: thinning, weeding, and mulching.
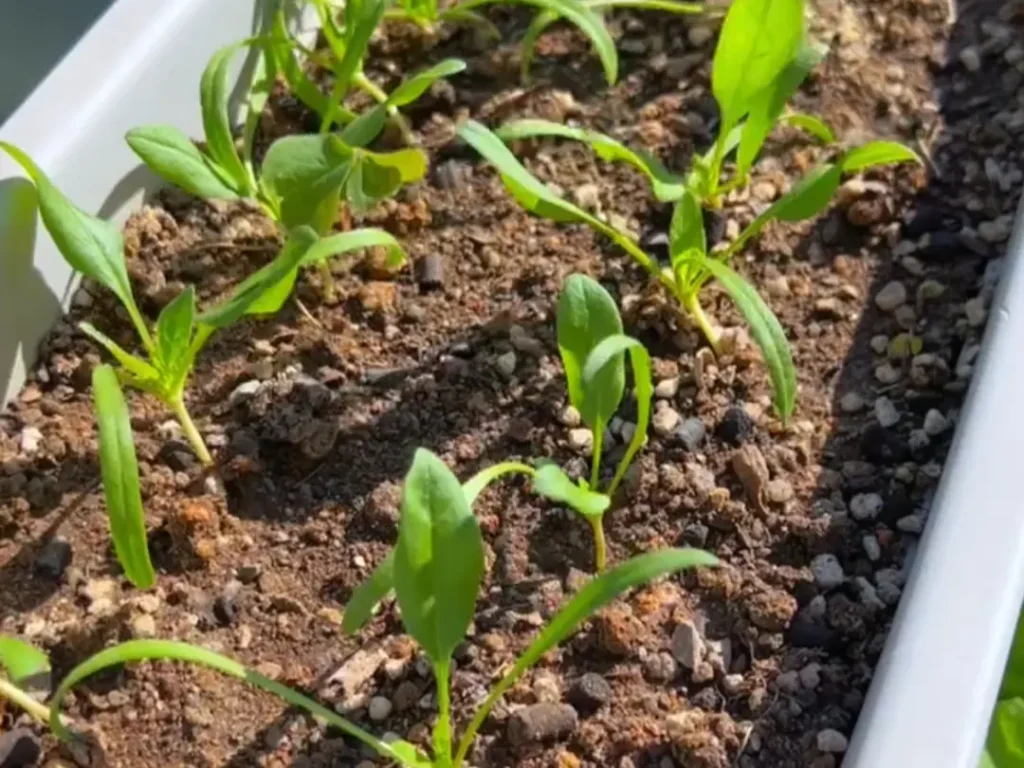
What to do:
- Thin the Seedlings: Once your seedlings are about 2 inches tall and have developed two or three “true leaves” (the leaves that appear after the initial two sprout leaves), it’s time to thin them. My guiding principle is simple: “thin the weak, leave the strong.” Examine the row and carefully remove the smaller, weaker-looking seedlings so that the remaining plants are spaced about 3-6 inches (8-15 cm) apart. You can do this by gently pulling them out, or to avoid disturbing the roots of the remaining plants, I often just snip the unwanted seedlings at the soil line with a pair of small scissors.
- Bonus Tip: Don’t throw away the thinnings! These tiny greens are your very first harvest of delicious, tender baby spinach, perfect for a salad.
- Perform a Thorough Weeding: Immediately after thinning, take the time to remove any and all weeds that have sprouted in and around your spinach rows. The root systems of young spinach plants are not very competitive, and even small weeds can steal crucial water and nutrients, stunting their growth.
- Apply a Layer of Mulch: After the bed is thinned and completely free of weeds, apply a 1-2 inch layer of organic mulch, such as straw, shredded leaves, or grass clippings. Be careful to apply the mulch around the base of the plants, not on top of them.
Why it’s important:
- Thinning is non-negotiable. Giving each plant its own space is essential for good air circulation (which prevents disease) and allows the root system to expand and gather the resources needed to produce large, healthy leaves.
- Mulching right after weeding is a powerful technique. It acts as a blanket to retain precious soil moisture, suppresses the next wave of weeds from sprouting, and, most importantly for spinach, it helps keep the soil cool, which is a key factor in delaying bolting as the season progresses.
With your spinach now properly spaced and mulched, the plants are well-established. Your focus now shifts to ongoing care. For the details on keeping them thriving with the right watering and feeding schedule, I cover that in the Expert Guide to a Healthy Harvest section below.
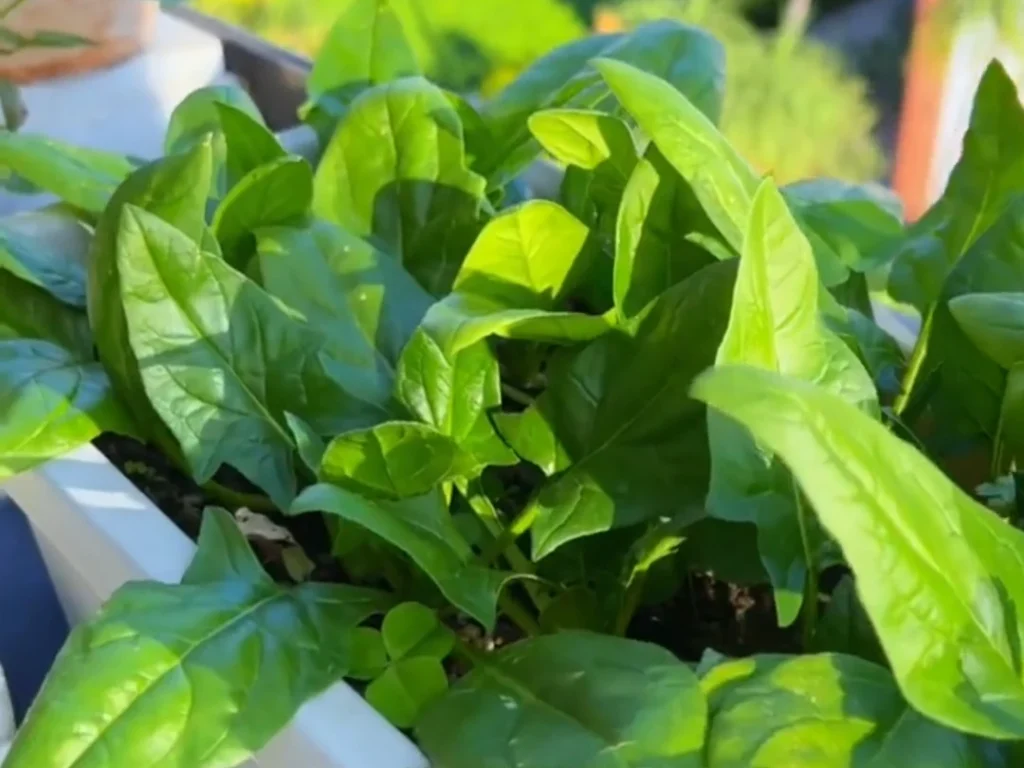
Step 5: Harvesting for Peak Flavor
This is the moment all your hard work pays off. Properly harvesting not only gives you the best-tasting spinach but can also encourage the plant to produce even more. Here’s my approach to getting the most out of your crop.
When to Harvest
- By Size: You can begin harvesting as soon as the outer leaves are a usable size, about 3-4 inches (8-10 cm) long. For a more substantial harvest, you can wait until the plants are about 6-8 inches (15-20 cm) tall and have a nice rosette of full, tender leaves.
- By Time of Day (Crucial Tip): For the absolute best quality, I always harvest in the cool of the morning or evening. Leaves picked at these times are fully hydrated, crisp, and will last significantly longer in your refrigerator than those picked in the midday heat.
- The Final Deadline: No matter which method you use, the golden rule is to harvest your spinach before the plant shows any signs of bolting (sending up a central flower stalk). Once this process starts, the leaves quickly become bitter.
How to Harvest
You have three excellent methods to choose from, depending on your needs and how you planted.
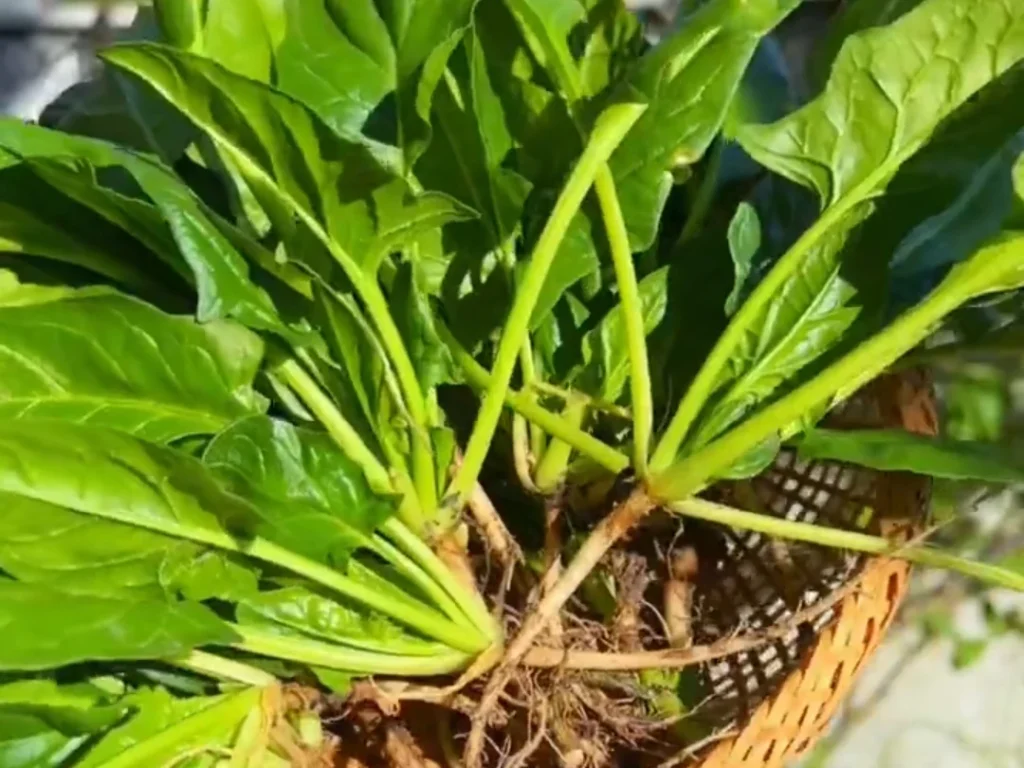
- The “Cut-and-Come-Again” Method (My Top Recommendation): This is the most productive method for a long, steady supply. Simply snip or pinch off the largest, outermost leaves at the base of the plant. Leave the small inner leaves and the central crown untouched. The plant will continue to produce new leaves from the center, allowing you to harvest from the same plants week after week.
- The Whole Plant Harvest: If you need a large amount of spinach at once, or if it’s the end of the season and you want to clear the bed, you can harvest the entire plant. Use a sharp knife to cut the plant off at its base, just above the soil line.
- Harvesting by Thinning: If you sowed your seeds more densely, you can use harvesting as a final thinning stage. Simply pull up the largest, most mature plants, roots and all. This gives the smaller, neighboring plants more space, light, and nutrients to grow larger for a subsequent harvest.
Step 6: Post-Harvest Handling & Storage
Getting your spinach out of the garden is only half the journey. How you store it determines whether it stays crisp for a week or becomes a slimy mess in just a day. To ensure your harvest lasts as long as possible, it’s critical to handle it correctly. Based on my research and experience, here are the best practices.
My Preferred Method: Storing Dry for Maximum Freshness
This is the method I, along with many university extensions, recommend for the longest storage life and best texture. The core principle is that excess moisture is the enemy of stored greens, as it encourages bacterial growth and decay.
- Handle Gently: Always be gentle with your harvest. Bruised or broken leaves will spoil much faster than intact ones.
- Keep Leaves Dry: Do not wash your spinach before storing. If you harvested in the cool morning and the leaves are damp with dew, lay them in a single layer on a kitchen towel to air dry completely.
- Pack for Freshness: Gently place the completely dry leaves into a plastic bag or a sealed container. I always add a fresh paper towel inside, which is a fantastic trick for absorbing any excess condensation.
- Store in the Crisper: Place the bag in your refrigerator’s crisper drawer, which maintains the ideal humidity to keep greens from wilting. Wash the leaves thoroughly right before you plan to eat them.
Alternative Method: Washing Before Storage
The University of Minnesota Extension suggests an alternative approach of rinsing the leaves under cold water immediately after harvesting and then refrigerating them. While this can work, my professional experience has shown that a critical step is required for success with this method.
My Expert Tip: If you choose to wash your spinach before storing, you must dry the leaves thoroughly afterward. Trapped water droplets are the primary cause of slimy, spoiled leaves. The most effective tool for this is a high-quality salad spinner. Spin the leaves until they are as dry as possible, then store them using the same paper towel and bag method described above.
Why it’s important: Whether you store your spinach dry, or wash and dry it first, the goal is the same: to control moisture. Proper storage is the final step in honoring your hard work, ensuring your homegrown harvest remains safe, crisp, and delicious for up to a week or even longer.
Expert Guide to a Healthy Harvest: Tips & Troubleshooting
Here is where I share my deeper knowledge on the ongoing care and problem-solving that will take your spinach crop from good to great.
Ongoing Care: Mastering Watering, Mulching, and Feeding
Once your spinach is established after thinning and mulching, your focus shifts to the consistent care that will guarantee a tender, abundant, and sweet-tasting harvest. Here’s how I approach the three key tasks for the rest of the growing season.
Watering: The Secret to Tender Leaves
Spinach leaves are over 90% water, and their quality is directly tied to moisture. A lack of consistent water is the primary cause of tough, fibrous leaves with a bitter flavor.
- Your goal is to keep the soil consistently moist but not waterlogged.
- In the early stages, watering every few days may be sufficient. However, as the plants grow larger and enter their peak growth phase, their water needs increase significantly.
- A simple way I like to check is to feel the soil; if the top inch is dry, it’s time to water. This ensures you’re responding to your garden’s actual needs, which can vary with weather. At the same time, ensure your garden bed has good drainage to prevent root rot, especially after heavy rains.
Mulch: Your Best Friend for Maintenance
The layer of organic mulch you applied in Step 4 is your secret weapon for ongoing care.
- It dramatically reduces the amount of watering you’ll have to do by slowing evaporation. It also keeps the soil cool—a key factor in preventing bolting—and continues to suppress any new weeds that try to compete with your plants.
- Maintain this layer throughout the growing season.
Feeding: A Strategic Approach for Lush Growth
My philosophy on feeding spinach aligns with horticultural experts at Cornell University: start with rich soil, and feed only when necessary. Spinach planted in soil that has been generously amended with compost (as described in Step 2) may not need any additional fertilizer at all. Over-fertilizing can harm the plants and the environment.
- When to Feed: The key is to watch your plants. Only add a supplemental fertilizer if you notice the leaves, especially the older ones, are turning pale green or yellow, or if growth seems stunted.
- What to Use: If you do need to feed, choose a liquid organic fertilizer that is high in nitrogen, such as fish emulsion or a worm casting tea.
- A Note for Container Gardeners: If you are growing spinach in containers, you may need to feed more regularly (e.g., every 2-3 weeks). Nutrients leach out of pots much faster with each watering, so a supplemental feeding can help maintain vigorous growth.
Pro-Tip #1: Combine Watering and Feeding. For the fastest absorption, I always dilute my liquid fertilizer according to the package directions and apply it with my watering can. This method of “fertigation” delivers nutrients directly to the roots in a form the plant can use immediately.
Pro-Tip #2 (Critical for Spring Crops): Avoid High-Phosphorus Fertilizers. This is one of the most important pieces of advice I can give to prevent premature bolting. While phosphorus is essential for overall plant health, an excess of it can act as a signal for the plant to start flowering. This is especially true in the warming weather and lengthening days of late spring. To encourage continuous, lush leaf growth, stick to balanced or high-nitrogen fertilizers.
Natural Pest and Disease Control
In my garden, the best defense is always a good offense. Instead of waiting for problems to appear, I focus on creating a healthy, resilient environment where pests and diseases struggle to take hold. This preventative approach is far more effective and less work in the long run.
My Prevention-First Strategy
- Practice Crop Rotation: Don’t plant spinach—or its close relatives like beets and Swiss chard—in the same spot for at least two to three years. This is the simplest way to break the life cycle of soil-borne diseases.
- Ensure Good Airflow: This is my top tip for preventing fungal disease. The proper spacing you established back in Step 4 allows leaves to dry quickly after rain or morning dew, making it difficult for mildew to thrive.
- Water the Soil, Not the Leaves: Fungal spores are spread by water. By using a soaker hose or watering carefully at the base of the plant, you keep the foliage dry and significantly reduce the risk of disease.
- Keep a Clean Garden: At the first sign of a heavily infested or diseased leaf, remove it from the plant and the garden. At the end of the season, clean up all plant debris to eliminate overwintering spots for pests and pathogens.
Common Pests and My Solutions
Aphids:
- Identification: You’ll find these tiny, pear-shaped insects clustered on the undersides of leaves or on new growth. They suck the plant’s sap, causing leaves to curl, yellow, and become stunted.
- Solutions: Start with the gentlest method first. A strong jet of water from your hose can knock them off. If they return, place yellow sticky traps to catch the winged adults, or spray the plants (especially the undersides of leaves) with an organic insecticidal soap.
Leaf Miners:
- Identification: You can’t miss their calling card: thin, white, winding tunnels that snake through the inside of the leaf tissue. This damage is caused by a tiny larva feeding safely between the leaf’s top and bottom layers.
- Solution: The most effective organic control is also the simplest. The moment you spot a leaf with a tunnel, pinch it off and destroy it. This removes the pest before it can mature into a fly and lay more eggs. There are no effective organic sprays that can reach the larvae once they are inside the leaf.
Common Diseases and My Solutions
Downy Mildew:
- Identification: This is the most common disease to watch for, especially in cool, damp weather. It first appears as pale yellow spots on the upper surface of the leaves. If you flip the leaf over, you’ll see a telltale fuzzy, purplish-gray mold on the underside.
- Solution: Prevention is everything—good air circulation is your best defense. If you spot it, immediately remove affected leaves to slow the spread. For persistent issues in my garden, I use an organic fungicide based on the beneficial bacterium Bacillus subtilis (often sold in North America under brand names like Serenade), which helps to suppress the disease.
In addition to downy mildew, university sources like the University of Minnesota Extension also note that Cercospora leaf spot can sometimes be an issue, particularly for spinach’s close relatives. This reinforces why crop rotation is so important.
A Final Note on Pests & Diseases: Remember that pest and disease pressures can vary greatly by region. If you encounter a problem you can’t identify, or if the organic methods above are not effective, your best resource is your local University Extension Service. They often provide free, region-specific advice and diagnostics for home gardeners.
Solving Common Problems with Spinach
Even with the best care, you might encounter a few bumps along the road. Don’t worry—most spinach problems are easy to diagnose and, more importantly, easy to prevent in the future. Here are the solutions to the most common issues I see.
Problem: My Spinach is Bolting (Flowering Prematurely)
- Likely Causes: Bolting is a stress response. The most common triggers are high temperatures (consistently above 75°F / 24°C), lengthening daylight hours in late spring, or inconsistent watering.
- My Solutions: Unfortunately, once a spinach plant begins to bolt, you can’t reverse the process. Harvest the entire plant immediately before the leaves become unpleasantly bitter. The real solution is prevention: Plant at the correct time for your season, always choose bolt-resistant varieties for spring plantings, maintain consistent soil moisture, and be ready to use shade cloth if an unexpected heatwave hits.
Problem: The Leaves are Tough and Bitter
- Likely Causes: The number one cause is a lack of consistent water, which causes the plant to develop more fiber. The second cause is simply waiting too long to harvest; older leaves are naturally tougher than young ones.
- My Solutions: Ensure your plants receive deep, consistent watering throughout their life—a good layer of mulch is essential for this. Begin harvesting leaves when they are still young and tender. A well-watered, young spinach leaf will always have the best flavor and texture.
Problem: The Leaves are Turning Yellow
- Likely Causes: This usually points to one of two opposite issues.
- Nitrogen Deficiency: If the lower, older leaves are turning yellow first while the new growth is still green, your soil is likely running out of nitrogen.
- Overwatering: If the entire plant, including new growth, looks pale yellow and the soil is constantly soggy, the roots are likely suffocating and may be starting to rot.
- My Solutions: First, feel the soil. If it’s waterlogged, hold off on watering and ensure your garden bed is draining properly. If the soil moisture seems fine but the lower leaves are yellow, it’s time to feed. An application of a high-nitrogen liquid fertilizer, like fish emulsion, will usually have them greening up within a week.
Problem: My Seeds Didn’t Sprout or Seedlings are Stunted
- Likely Causes: This is a common frustration, especially for fall plantings, and it often comes down to two things.
- Hot Soil: Spinach seeds are programmed to germinate in cool conditions and will remain dormant or rot if the soil is too warm.
- Wrong Variety for the Season: Planting a cold-hardy variety in the summer heat, or a heat-tolerant variety in the dead of winter, will lead to germination failure or weak, stunted plants.
- My Solutions: If you are sowing in the warm soil of late summer, use the seed priming technique I described in the “When to Plant” section. For all plantings, double-check your seed packet. As I mentioned in Step 1, ensuring your chosen variety matches the season you’re planting in is the absolute foundation for success.
Frequently Asked Questions (FAQ)
Yes, spinach grows wonderfully in containers. Choose a pot that is at least 6-8 inches deep and has excellent drainage holes. Use a high-quality potting mix rather than garden soil to prevent compaction. The main thing to remember is that containers dry out much faster than garden beds, so you will need to be extra diligent about watering.
No, spinach is an annual plant and must be replanted each season. It is programmed to complete its entire life cycle—from seed to leaf to flower to seed—in a single year. It will not grow back from its roots after the final harvest.
Planting from seed is strongly recommended. Spinach has a long, sensitive central taproot that dislikes being disturbed. The process of transplanting often shocks this root system, which can lead to stunted growth or cause the plant to bolt prematurely. Since the seeds germinate so easily in cool soil, direct sowing is the most reliable path to success.
Yes, you can, but providing enough light is the biggest challenge. Spinach needs at least 4-6 hours of direct light per day to produce a decent harvest. A very sunny, south-facing window might be sufficient, but for the best results, you will need to use a full-spectrum grow light positioned a few inches above the plants for 10-12 hours a day.
While university guides don’t typically provide a specific number for this, here is my practical recommendation based on the “cut-and-come-again” harvesting strategy taught in this guide.
For a continuous supply of fresh leaves for one person, I recommend planting a block of 10-15 spinach plants. Here’s the logic: since you will only harvest a few outer leaves from each plant at any one time, you need a solid number of plants to gather enough for a single meal without over-stressing any individual one. This quantity allows for a sustainable, recurring harvest right through the season. For a family, you can multiply accordingly.
Technically yes, the leaves are still safe to eat, but you probably won’t want to. The moment a spinach plant bolts, it diverts all its energy from leaf production to making seeds. The existing leaves rapidly become bitter and tough. At this point, it’s best to pull the plant, add it to your compost pile, and replant the space with a new, season-appropriate crop.
Yes, you absolutely can, and it’s a very rewarding process. Simply allow one or two of your healthiest, most vigorous plants to bolt and complete their flowering process. Spinach is wind-pollinated, so keep in mind that different varieties planted near each other may cross-pollinate. The flowers will eventually turn into clusters of seeds along the stalk. Wait until the plant is mostly dry and the seeds are brown and hard, then strip them from the stalk and store them in a cool, dark, and dry place for next season’s garden.