Hello, I’m Yun, the founder of The Planting Key.
There are few things in the garden as rewarding as the treasure hunt for ripe pea pods, and even fewer flavors that can rival the candy-like sweetness of a snap pea picked straight from the vine.
It’s a taste of pure, vibrant spring that you simply cannot find in a grocery store.
When I first began researching North American gardening to help a friend, I discovered that this simple joy was something every gardener, no matter their experience level, could and should have.
I know that starting a new vegetable can sometimes feel like a puzzle, with questions about timing, soil, and care. Please don’t worry.
I’ve designed this guide to be your complete, step-by-step roadmap.
My promise to you is that by the time you finish reading, you’ll have the knowledge and confidence to take a tiny seed and nurture it into a thriving plant loaded with delicious pods.
This guide is just one piece of the puzzle; for more in-depth advice on other garden favorites, you can explore my complete library of Vegetable Growing Guides.
Let’s get started on your pea-growing adventure together!
Core Summary (TL;DR)
- Plant in Cool Weather: Peas are a cool-season crop. Plant seeds in early spring as soon as the soil is workable, or in late summer for a fall harvest. They falter in the summer heat.
- Provide Full Sun & Good Drainage: Choose a spot that receives at least 6-8 hours of direct sunlight per day with soil that drains well to prevent root rot.
- Support is Non-Negotiable for Vining Types: Most pea varieties are climbers and require a trellis, fence, or netting installed at planting time to stay healthy and productive.
- Harvest Frequently: The more you pick, the more the plant will produce. Regular harvesting prevents pods from becoming tough and encourages the plant to set more flowers.
Quick Facts for Growing Peas
| Characteristic | Details |
| Sunlight | Full Sun (6-8 hours/day) |
| Soil Type | Well-drained loam, average fertility, high in organic matter |
| Soil pH | 6.0 – 7.5 (Slightly acidic to neutral) |
| Plant Spacing | 1-4 inches between plants |
| Row Spacing | 18 inches (standard); 4-6 feet (for trellised varieties) |
| Planting Depth | 0.5-2 inches (Shallow in wet soil, deep in dry soil) |
| Days to Germination | 7-14 days (Varies with soil temp) |
| Days to Harvest | 55-70 days from sowing |
| Support | Yes, for most vining varieties |
| Key Nutrients | Phosphorus (P), Potassium (K) |
When to Plant Peas
The short answer is: Plant peas in early spring as soon as your soil has thawed and can be worked. From my own experience tracking spring weather, a great indicator is when the average air temperature is consistently holding between 32-41°F (0-5°C). As a quintessential cool-season crop, peas thrive in the mild temperatures of spring and autumn and must be timed to mature before the intense heat of summer arrives or the first hard frost of winter sets in.
Pea Planting Calendar (USDA Zones 4-9)
How to Read This Calendar
The calendar below provides key planting dates for two different gardening styles: Aggressive (to maximize your season) and Safe (to minimize frost risk). You’ll notice the ‘Aggressive’ fall dates start later—this is a deliberate strategy to extend the harvest as late as possible.
Pea-Specific Timing Rules
Spring Planting: These dates are for direct-sowing seeds into your garden. They are intentionally set 4 to 6 weeks before your average last frost date. This early start is crucial for these cold-loving plants, giving them the entire cool spring season to grow and produce a heavy crop before the summer heat arrives.
Fall Planting: These dates are also for direct-sowing. They are intentionally set 8 to 10 weeks before your average first fall frost date. This timing is strategic, allowing seeds to germinate quickly in warm soil while the plants mature during the cool, flavor-enhancing temperatures of autumn, often resulting in the sweetest peas.
| USDA Zone | Spring Planting(Aggressive) | Spring Planting(Safe) | Fall Planting(Aggressive) | Fall Planting(Safe) |
| Zone 4 | Mar 28 – Apr 11 | Apr 3 – Apr 17 | Jul 22 – Aug 5 | Jul 17 – Jul 31 |
| Zone 5 | Mar 19 – Apr 2 | Mar 26 – Apr 9 | Jul 31 – Aug 14 | Jul 25 – Aug 8 |
| Zone 6 | Mar 16 – Mar 30 | Mar 27 – Apr 10 | Aug 9 – Aug 23 | Jul 24 – Aug 7 |
| Zone 7 | Feb 23 – Mar 9 | Feb 25 – Mar 11 | Aug 27 – Sep 10 | Aug 16 – Aug 30 |
| Zone 8 | Feb 9 – Feb 23 | Feb 22 – Mar 8 | Aug 31 – Sep 14 | Aug 21 – Sep 4 |
| Zone 9 | Jan 17 – Jan 31 | Feb 4 – Feb 18 | Sep 21 – Oct 5 | Sep 1 – Sep 15 |
✔ Accuracy is my priority. The key planting dates in this calendar are calculated based on representative Aggressive and Safe frost date baselines established for each zone. Because your garden’s microclimate may vary, I strongly recommend that you verify your local frost dates for the most accurate timing. Learn My Methodology & Find a Frost Date Tool Here.
Understanding the Planting Windows
Spring Planting: Seizing the Cool Season
The primary goal of spring planting is to get your pea seeds in the ground early enough so the plants can grow, flower, and produce pods during the cool, mild weather they love. Don’t worry about a late spring frost; this is where peas show their resilience.
While my own garden in Guangzhou is mild, my extensive research for North American gardeners has confirmed that pea seedlings are remarkably tough, able to survive a surprise dip down to about 23°F (-5°C) with no ill effects.
What’s even more fascinating is that a light touch of frost on the young shoots isn’t always a bad thing. This minor stress can actually encourage the plant to branch out and produce more secondary shoots, potentially leading to an even bigger harvest.
Getting them started early is key to a long and abundant harvest before the summer heat arrives.
Fall Planting: Your Second Harvest Opportunity
In many zones, you get a second chance at a pea harvest in the fall. The strategy here is to plant seeds in late summer when the soil is still warm, which encourages rapid germination. The plants will then do the majority of their growing as the air temperatures begin to cool down in early autumn. This often results in exceptionally sweet peas, as the cool nights help concentrate the sugars in the pods.
The Danger Zone: Why Summer Heat is the Enemy
Peas and high heat do not mix. In my observation, the real trouble starts once temperatures consistently exceed 80-85°F (27-29°C). At this point, pea plants become visibly stressed. This heat stress causes two major problems:
- Flowering Stops: The plant will stop producing new flowers, which means no new pods.
- Pods Decline: Existing pods can become tough, fibrous, and lose their sweetness. Indeed, the flowering and podding stage is particularly vulnerable to heat and drought, effectively ending your harvest season.
Key Factors & Advanced Strategies
The Secret Signal: Ideal Soil and Air Temperatures
While calendars are helpful, the most accurate signals come from the environment itself. Understanding these temperature cues will make you a more intuitive gardener.
- The Signal to Sow:Your earliest planting window opens when average air temperatures stabilize around 32-41°F (0-5°C) and the soil is no longer frozen.
- Ideal Soil Temperature for Germination: Pea seeds can germinate in soil as cold as 40°F (4°C), but it will be very slow. The optimal soil temperature for fast, reliable germination is between 60°F and 75°F (16-24°C).
- Ideal Air Temperature for Growth: Pea plants grow most vigorously and produce the best-quality pods when daytime air temperatures are between 55°F and 65°F (13-18°C).
Pro Technique: Succession Planting
This is one of my favorite techniques to ensure a steady supply of fresh peas, rather than being overwhelmed by one single harvest. To achieve this, I strongly recommend practicing succession planting. This simple technique involves sowing a new, small batch of seeds every 10 to 14 days throughout your spring planting window. This staggers the maturity of the plants, ensuring you have a fresh harvest ready for several weeks.
Extending Your Season: Getting an Earlier Start and Later Harvest
For the truly passionate gardener wanting to push the boundaries of the season, here are two methods I’ve found to be very effective in my research and practice:
- Earlier Start (Spring): Use cold frames or low tunnels covered in plastic to warm the soil a few weeks earlier than the rest of the garden, allowing you to sow seeds sooner.
- Later Harvest (Fall): In zones with hot late summers, you can use shade cloth to protect young fall-sown pea seedlings from the intense sun until the weather cools. This can help bridge the gap and ensure they survive to thrive in the autumn.
How to Plant, Grow, and Harvest Peas: A Step-by-Step Guide
Follow these chronological steps, and you’ll be well on your way to a delicious harvest. I will cover the core planting and harvesting process here, with more detailed ongoing care tips in the Expert Guide section below.
Step 1: Choose the Right Variety
Your first decision is what kind of pea you want to eat! This choice determines how you’ll harvest and use them.
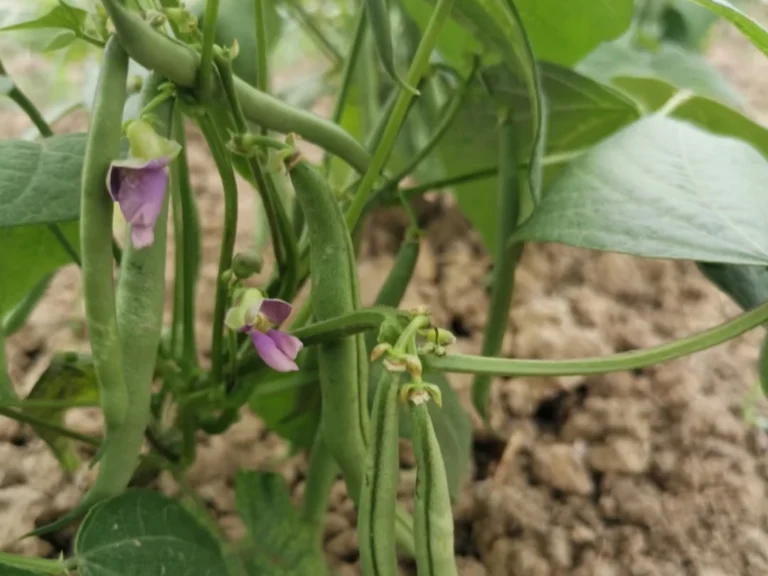
- Snow Peas (e.g., ‘Oregon Sugar Pod’): These are grown for their flat, tender, edible pods. Harvest them before the peas inside begin to swell. They are perfect for stir-fries.
- Snap Peas (e.g., ‘Sugar Snap’): These have plump, crisp, sweet edible pods with full-size peas inside. They are fantastic eaten raw as a snack or lightly steamed.
- Shelling Peas (e.g., ‘Lincoln’): Also known as garden or English peas, these are grown only for the sweet peas inside. The pods are tough and must be shelled before eating.
- Dry or Field Peas (e.g., ‘Amish’): Less common in home gardens, these peas are grown until the pods and peas inside have fully dried on the vine. The dried peas are then shelled and stored for use in soups, stews, and dals.
It’s also critical to check the growth habit on your seed packet. Pea varieties range dramatically in height from dwarf bush types as short as 1 foot to vigorous vining types that can climb to 8 feet or more. While shorter bush types may not strictly require support, providing a small trellis will always lead to a healthier, easier-to-manage plant.
Step 2: Prepare the Perfect Soil and Location
Peas are not overly demanding, but a little preparation of their home will pay huge dividends in plant health and pod production.
- Location: Select your sunniest spot—at least 6-8 hours of direct sun is best for vigorous growth and the sweetest pods.
- Soil Texture: The ideal soil is a well-drained loam or sandy loam that is rich in organic matter. Peas have sensitive roots and dislike two extremes: heavy, dense clay, which can hold too much water and inhibit the root’s beneficial bacteria, and overly light, sandy soil, which drains too quickly and doesn’t hold nutrients well.
- Amendments and Preparation:
- The simplest way to improve any soil is to work a 2-3 inch layer of rich compost or well-aged manure into the top 6-8 inches. Well-composted poultry manure, as your experience suggests, is an excellent choice.
- Pro-Tip for Drainage: If your soil is heavy or drains poorly, consider creating raised rows or a raised bed. This simple step lifts the roots out of soggy ground and is one of the best forms of insurance against root rot.
- To boost potassium for strong flowering, you can amend the soil with a small amount of wood ash. Be mindful not to use too much, as it will also raise the soil pH.
- Soil pH is Critical:
- Aim for a soil pH between 6.0 and 7.5.
- This range is vital because peas form a symbiotic relationship with beneficial soil bacteria (rhizobia) that create nodules on their roots to fix nitrogen from the air. If the soil is too acidic (below 5.5), this process is severely inhibited, and the plant cannot thrive. If a soil test shows your soil is too acidic, you can amend it with garden lime.
- Bonus: Container Soil Recipe:
- If you are growing in containers, a fantastic, well-draining mix can be made by combining: 5 parts leaf mold or high-quality potting mix, 3 parts composted chicken manure, and 2 parts perlite. This recipe provides the perfect balance of structure, drainage, and gentle nutrition.
Why this is important: Peas are legumes, meaning they create their own nitrogen. Providing them with a balanced start using compost avoids overloading them with nitrogen fertilizer (which results in leaves but no pods). Ensuring the soil has the right texture and pH allows this amazing natural nitrogen-fixing process to work at its best, creating a healthier and more productive plant.
Step 3: Sowing Seeds
With your bed prepared, it’s time to plant. While you can plant pea seeds directly from the packet, taking a few extra preparation steps can dramatically increase your germination rate and give your plants a vigorous start.
Pro-Tip: Give Your Seeds a Head Start
In my own garden, I almost always pre-treat my pea seeds before planting. This optional process known as pre-sprouting or “chitting,” is especially helpful in the cold, heavy soils common in early spring. I find it consistently boosts my germination rates and leads to stronger seedlings.
- Select the Best Seeds: Pouring your seeds onto a plate. Select only the largest, most uniform, and undamaged seeds. Discard any that are small, shriveled, cracked, or show signs of mold.
- Soak to Rehydrate: The tough seed coat of a pea can slow down water absorption. Soak your selected seeds in room-temperature water for 8-12 hours (or overnight) to soften the coat and wake up the embryo inside. The seeds will swell to nearly double their size.
- Sprout for Speed (Optional): After soaking, drain the water. To go one step further, you can place the soaked seeds between layers of damp paper towel, put them in a loosely sealed plastic bag, and keep them in a warm spot (around 68°F / 20°C). Within 2-3 days, you should see tiny white roots emerge. Plant them immediately once you see this root.
Applying Inoculant
If you’re using a rhizobial inoculant (highly recommended for areas where peas haven’t grown before), now is the time to apply it. After soaking and just before planting, moisten the seeds slightly and gently shake them in a bag with the inoculant powder until they are coated.
The Sowing Process
- Sowing Depth: A general rule is to plant seeds between 1 and 2 inches deep. However, here is a professional technique to adapt to your specific soil conditions: in the cool, wet soil of early spring, plant shallower at 1 inch or even 0.5 inches deep. If your soil is on the drier side, plant deeper, up to 2 inches, to ensure the seed stays in contact with consistent moisture.
- Spacing (Based on Variety): Proper spacing is one of the most important factors for a healthy harvest. It ensures each plant gets enough light and, crucially, promotes the airflow needed to prevent fungal diseases like powdery mildew.
- Plant Spacing: In the row, sow seeds 1-4 inches apart.
- Row Spacing for Bush/Dwarf Varieties: For shorter, non-trellised peas, space your rows about 18 inches apart.
- Row Spacing for Vining/Trellised Varieties: This is where ample space is a game-changer. For taller varieties that require a trellis, space the rows 4 to 6 feet apart. While this may seem excessively wide, this professional method provides maximum air circulation, which is the single best defense against disease and leads to a larger, healthier yield.
- Method: A highly effective method is to plant a double row. Within your wide 4-6 foot alley, create two parallel furrows just 6-8 inches apart. You can then place a single trellis between these two closely spaced rows for them to share. The wide space is maintained between each set of double rows.
- Final Touches: Once the seeds are in place, cover them with soil. Gently tamp down the soil surface with your hand or the back of a hoe. This ensures good seed-to-soil contact, which is vital for water absorption. Water the area well with a gentle shower.
A Note on Germination Time: Patience is a Gardener’s Virtue
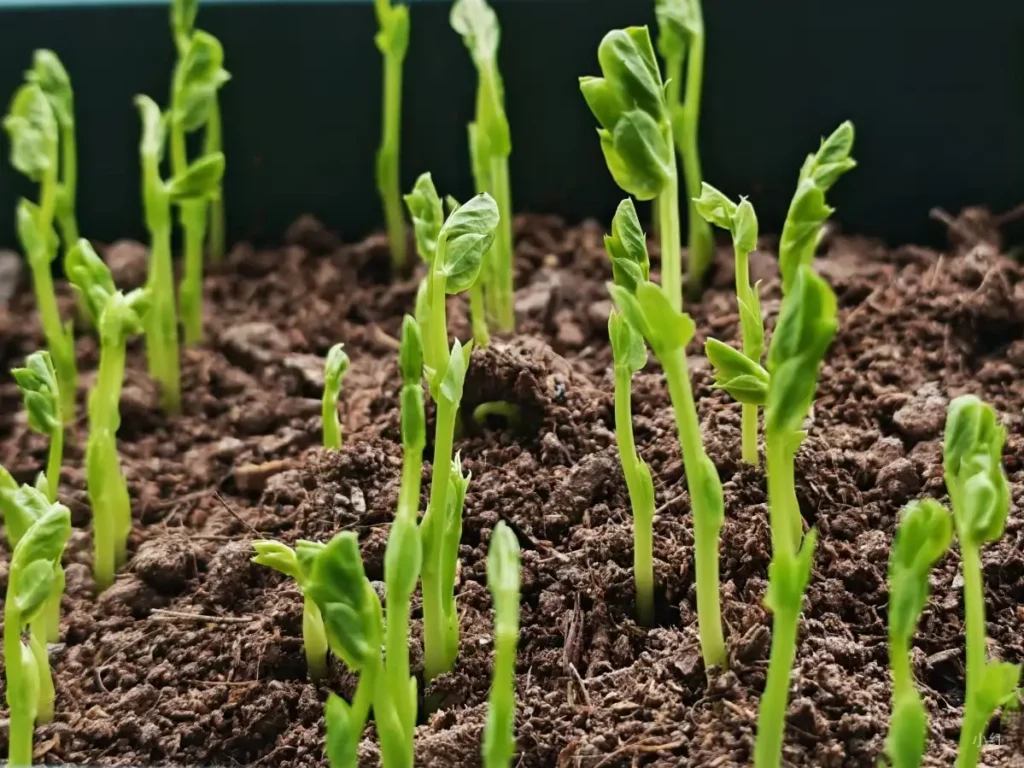
Especially in the cool soils of early spring, remember that germination speed is directly tied to soil temperature. Understanding this relationship will help you know what to expect:
- At 60°F (16°C): Expect sprouts in about 9 days.
- At 50°F (10°C): Germination may take around 13 days.
- At 40°F (4°C): It can take as long as 4 to 5 weeks for seedlings to appear.
So, if you plant very early, don’t be discouraged if you don’t see sprouts right away. They are just taking their time in the cold ground!
Step 4: Thinning Seedlings and Providing Support
This step is crucial for transitioning your plants from fragile sprouts to established, productive vines. It involves giving them space to grow and a structure to climb on.
- Thinning:A Tale of Two Methods
When it comes to seedling density, you will find two different expert opinions, and both are correct depending on the goal.
- The High-Density Method (No Thinning): Some authoritative sources, like Cornell University, recommend a “band planting” method where seeds are sown thickly in a 3-inch-wide band. For this specific method only, the advice is “do not thin.” The goal is to create a dense mat of plants that supports itself and outcompetes weeds. This is an effective technique often used in larger-scale or market gardening.
- The Spacing Method (Thinning Recommended): For most home gardeners, this guide recommends the traditional method of thinning your seedlings. The goal is to cultivate exceptionally strong, individual plants with maximum air circulation. This approach is easier to manage on a small scale and is the single best way to ensure each plant has the resources and airflow to ward off diseases like powdery mildew.
How to Thin for a Healthy Home Garden:
To follow my recommended method, thinning is essential to prevent seedlings from becoming weak and “leggy” as they stretch for sunlight.
First Thinning: When seedlings are about 2-3 inches tall, do an initial thinning to remove the weakest sprouts and create some breathing room.
Final Thinning: A week or two later, once the plants have developed 2-3 true leaves, perform a final thinning to a spacing of about 1-4 inches apart, selecting only the strongest, healthiest seedlings to keep.
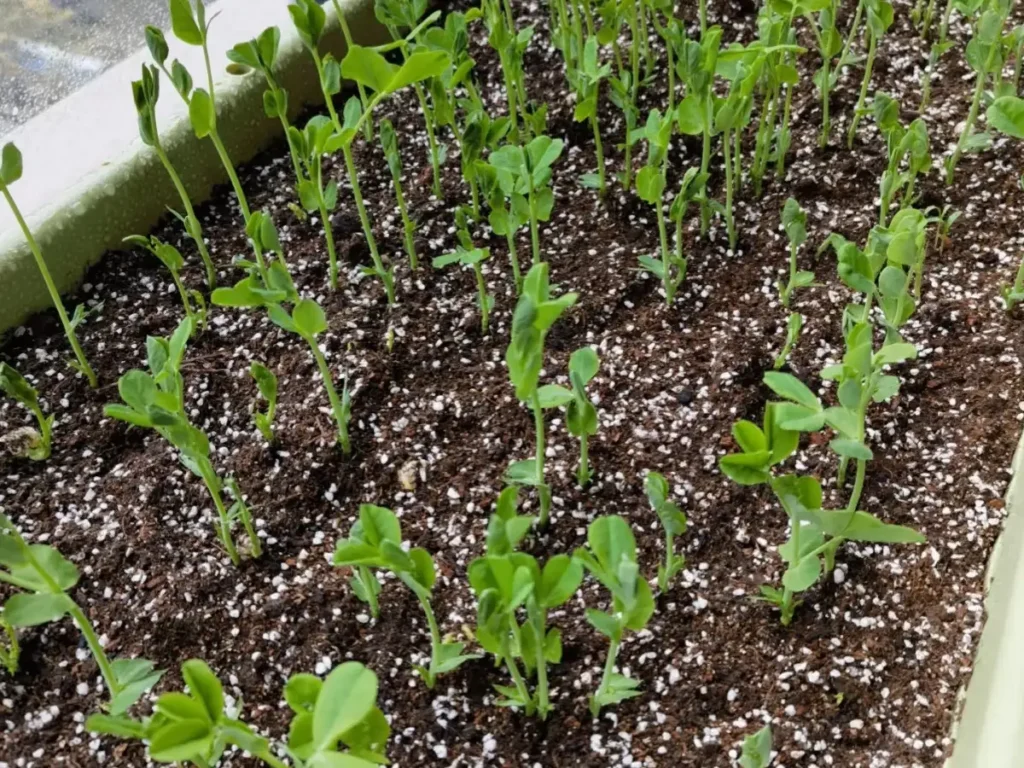
The Technique: Instead of pulling the unwanted seedlings (which can disturb the roots of the ones you’re keeping), simply snip them off at the soil line with a pair of small scissors.
Providing Support: It is critical to install your trellis, netting, or stakes while the plants are still small.
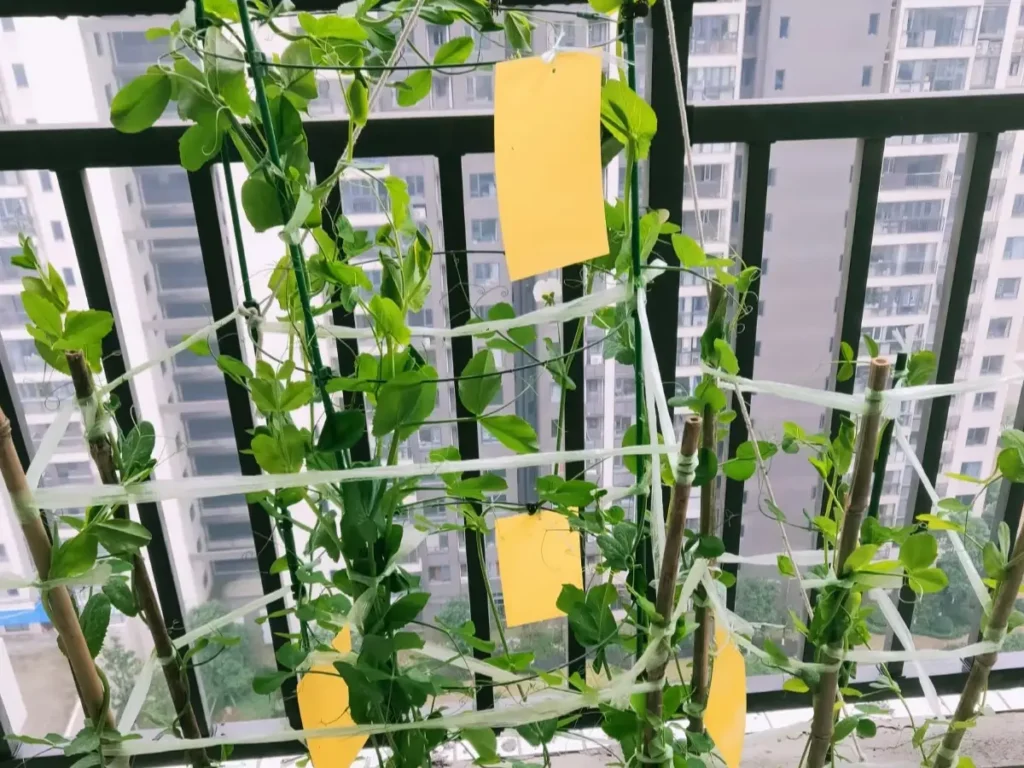
When to Install:When your plants reach about 6-8 inches (around 20cm) in height, it’s the perfect time to set up your support structure. Waiting any longer risks damaging their delicate root systems. A simple and effective option is an “A-frame” trellis made with bamboo canes and twine.
How to Support: Initially, you may need to gently guide the first tendrils toward the support. As the vines grow, your job is to be their guide. Gently weave any wandering stems back into the trellis. You can use soft garden twine to loosely tie the main stem to the support every 6-8 inches to encourage upward growth and prevent them from flopping over in wind or rain.
Why this is important: A good support structure keeps the vines off the ground, which dramatically improves air circulation (preventing disease), makes it harder for pests like slugs to reach the pods, and makes harvesting a thousand times easier.
For detailed information on keeping your established plants thriving with the right amount of water and nutrients, be sure to read my Expert Guide section on Ongoing Care below.
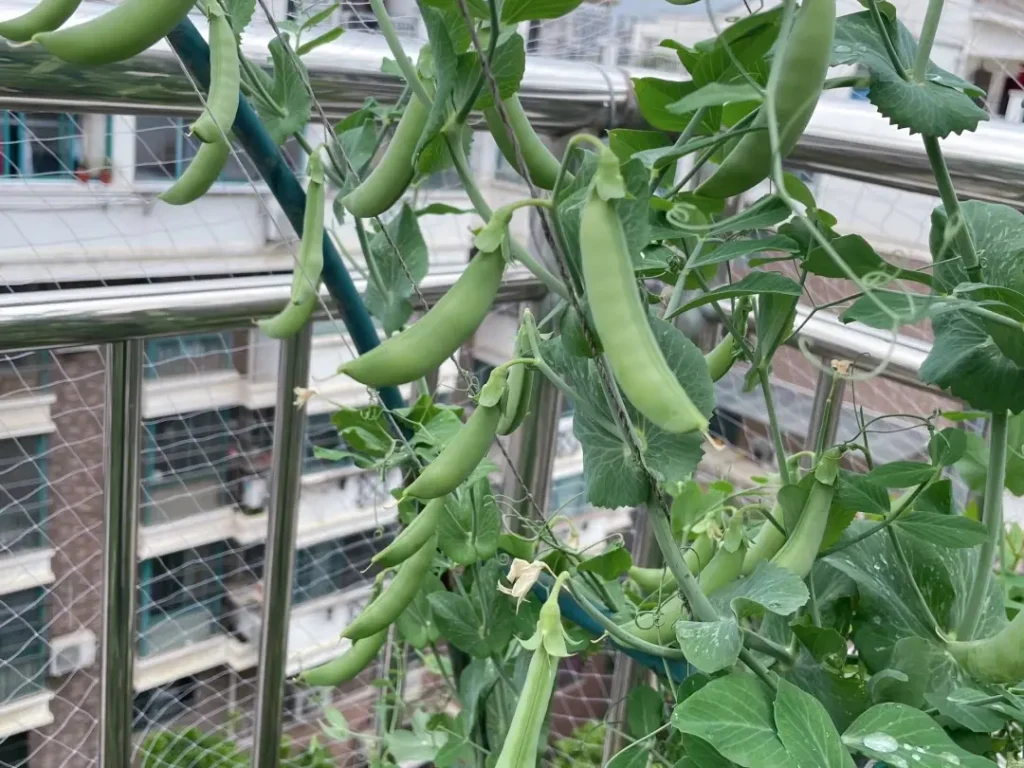
Step 5: Harvesting for Peak Flavor
The reward for your patience is here! The key to the best-tasting peas is harvesting at the right time and doing it often.
When to Harvest:
- Snow Peas: Harvest when pods have reached their mature length but are still almost completely flat.
- Snap Peas: Harvest when the pods are plump, rounded, and glossy. If you open one up, the peas inside should be small and tender. Don’t let them get dull or bulge too much.
- Shelling Peas: Harvest when the pods are fully swollen and feel firm, with the peas inside creating visible, rounded bumps.
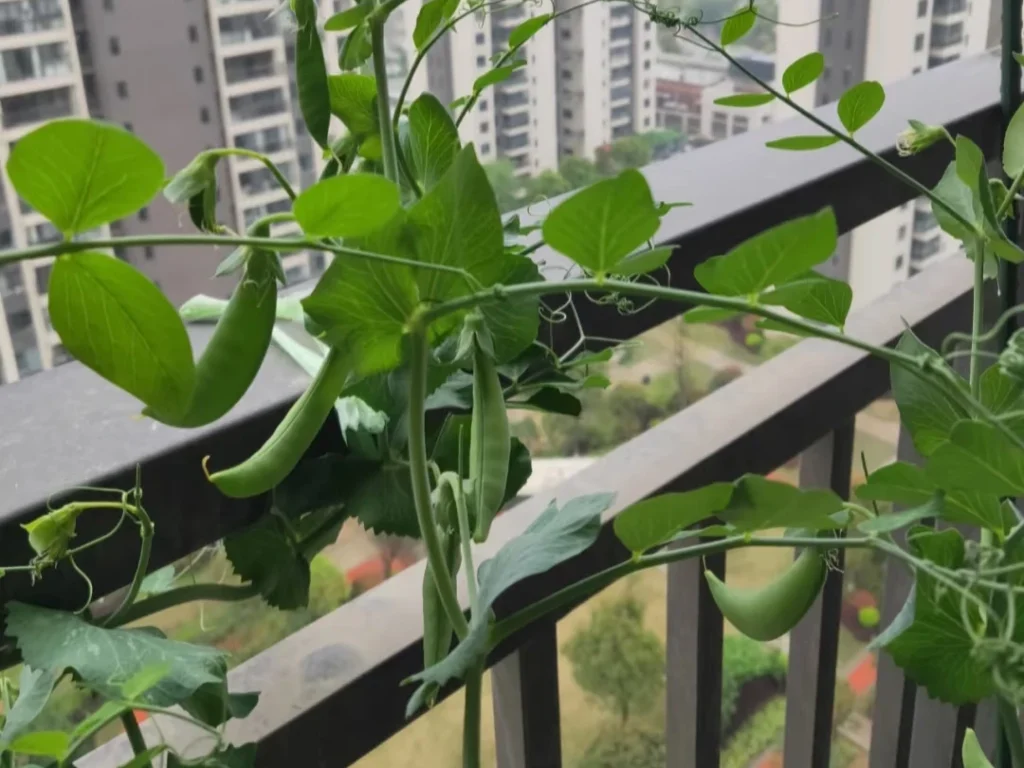
How to Harvest:
- Harvest frequently! Check your plants every day or two once they start producing. The more you pick, the more energy the plant will put into making new pods.
- Use two hands to harvest: one to hold the vine steady and the other to gently pull the pod off. This prevents you from accidentally tearing the fragile vine.
Pro-Tip for a Longer Harvest:
Pea production requires a lot of potassium. To prevent the plants from getting exhausted and ending their season early (a process called early senescence), you can give them a boost during the peak harvest period. After your first couple of pickings, feed the plants with a liquid fertilizer that is high in potassium (K), such as a compost tea or a fertilizer formulated for tomatoes and fruits.
Step 6: Post-Harvest Handling & Storage
Peas are at their absolute best right after picking because their sugars begin converting to starch almost immediately.
- Short-Term: If you can’t eat them right away, place unwashed pods in a perforated plastic bag in the refrigerator’s crisper drawer. They will keep for a few days, but their sweetness will decline daily.
- Long-Term: For longer storage, peas freeze beautifully. Quickly blanch them in boiling water for 1-2 minutes, then immediately plunge them into an ice bath to stop the cooking process. Drain well, pat dry, and freeze in a single layer on a baking sheet before transferring to a freezer bag.
Expert Guide to a Healthy Harvest: Tips & Troubleshooting
Ongoing Care: Mastering Watering, Mulching, and Feeding
Healthy pea plants don’t require constant fussing, but giving them the right support at the right time is the secret to a truly massive harvest. The secret to what I believe is a truly massive pea harvest comes down to a simple principle I personally call “Control in the beginning, promote later.” This is a philosophy I’ve developed over many seasons, and it means encouraging strong roots first, then pushing for vigorous growth and pod production.
Phase 1: The Establishment Stage (Seedling to ~8 inches tall)
This phase is all about building a strong foundation.
- Watering:Practice “tough love.” Pea seedlings have some drought tolerance. Water them only when the top inch of soil is dry. Allowing the soil to dry out slightly between waterings (the “see dry, see wet” principle) forces the roots to grow deeper in search of moisture, creating a more resilient plant.
- Feeding:Do not feed your seedlings. The initial compost in the soil is plenty. Indeed, adding nitrogen fertilizer at this stage is a mistake. It will only encourage weak, leafy growth at the expense of a strong root system.
Phase 2: The Active Growth Stage (Vining Before Flowers Appear)
Once your plants are established and starting to climb their trellis, their needs will change.
- Mulching: This is the perfect time to apply a 2-3 inch layer of organic mulch (like straw or shredded leaves). This will suppress weeds, retain the soil moisture that the growing plants need, and keep the roots cool.
- Feeding: Now you can begin a gentle feeding routine. Once the plants are actively climbing, start feeding them every 10-14 days with a balanced liquid organic fertilizer, such as compost tea or a half-strength fish emulsion. This provides the steady energy they need to build their green leafy structure.
Phase 3: The Production Stage (Flowering and Harvesting)
This is the “promote” phase, where your goal is to support the demanding work of producing flowers and pods.
- Watering:This is the most critical period for consistent water. Never let the soil dry out completely. Keep the soil consistently moist, but not waterlogged. A key professional tip is to avoid sudden, heavy flooding, especially during flowering, as this can stress the plant and cause it to drop its precious blossoms.
- Feeding: Switch your fertilizer strategy. Stop using the balanced fertilizer and start using a liquid fertilizer that is high in Phosphorus (P) and Potassium (K) every 7-10 days. These are the key nutrients for flower and fruit development. Look for products often labeled as “Bloom” or “Fruit & Flower” formulas. A weekly foliar spray (spraying the leaves) with a diluted high-P&K fertilizer is also an excellent professional technique to boost production. Continue this feeding routine throughout the entire harvest period to prevent the plants from becoming exhausted and to maximize your yield.
Supporting and Pruning Your Plants
While installing a trellis early on is a critical first step, actively managing your pea vines as they grow will keep them healthier and boost your harvest.
Ongoing Support: Guiding the Vines
Your support structure provides the highway, but you may need to play traffic cop. As your pea plants grow, check on them every few days. Some vines will naturally find the trellis, but others may wander off.
- Gently weave any stray vines back into the netting or around the stakes.
- For string or pole supports, you can encourage the vines to spiral upwards as you guide them.
- Don’t force them. The vines are delicate. If a vine doesn’t want to go a certain way, use a loose loop of soft garden twine to gently secure it to the trellis. Consistent, gentle guidance is the key to creating a well-ventilated and easy-to-harvest wall of green.
Pruning for a Bigger Harvest: The Art of “Pinching”
Now, let me share an optional technique I’ve adopted to get the absolute most out of my vining peas. It’s called ‘pinching’ or ‘topping,’ and I’ve found it can significantly increase the final yield, especially on the most vigorous varieties.
- The Goal: The main goal of pinching is to temporarily stop the plant’s upward (vertical) growth. This redirects the plant’s energy into producing more fruit-bearing side shoots, resulting in a bushier plant with more pea pods.
- When to Pinch: The best time to do this is when the main vine has reached the top of your trellis (typically around 5 feet or 1.5 meters tall). At this point, it has nowhere else to climb upwards anyway.
- How to Pinch: It’s incredibly simple. Using your fingers or a clean pair of snips, remove the very top growing tip of the main vine. This is the soft, leafy cluster at the very end.
- The Result: Within a week or two, you will notice the plant putting out new, vigorous side shoots from the leaf nodes below where you made the cut. These new shoots will produce flowers and, ultimately, more pods for you to harvest.
Natural Pest and Disease Control
The best defense against pests and diseases is a good offense—a healthy, thriving plant is naturally more resilient. The guiding principle for managing garden problems should always be: prevention is the best medicine.
Key Prevention Strategies
- Crop Rotation: This is a non-negotiable strategy for long-term garden health. Do not plant peas or other legumes (like beans) in the same spot more than once every four years. This longer rotation period is critical to effectively disrupt the life cycles of persistent soil-borne diseases that can build up over time.
- Promote Good Airflow: As emphasized in the previous steps, proper spacing and a sturdy trellis are your best friends. Good air circulation around the leaves makes it much harder for fungal diseases like powdery mildew to take hold.
- Water Wisely: Water your plants at the base, near the soil line. Wetting the leaves creates a welcoming environment for fungal spores. Watering in the morning is also preferable, as it allows any moisture on the leaves to dry before nightfall.
Common Pests and Natural Solutions
- Aphids: These are the most common pea pest, often found clustered on new growth.
- Solution 1: A strong blast of water from the hose can physically knock them off the plants.
- Solution 2: Hang yellow sticky traps near your plants to catch the winged adults.
- Solution 3: For larger infestations, spray the plants with an insecticidal soap solution. A homemade version can be made with a ratio of about 1 teaspoon of mild dish soap to 1 quart (1 liter) of water.
- Solution 4: Encourage Natural Predators. Before you spray, inspect your plants closely. You may find nature’s pest control at work, such as the alligator-like larvae of lady beetles and lacewings. These are voracious aphid predators, and if you see them, consider holding off on sprays that might harm these garden allies.
- Leaf Miners: You’ll know you have these if you see white or yellowish “tunnels” or squiggly lines inside the leaves.
- Solution: The best organic control is to simply pinch off and destroy any affected leaves as soon as you see them. This removes the larvae before they can mature and reproduce.
- Seedcorn Maggots: These small larvae attack germinating seeds, particularly in the cool, wet, and manure-rich soils of early spring, and are a common cause of poor germination.
- Solution: The best defense is avoiding the use of fresh, uncomposted manure in your pea patch. Waiting for the soil to warm up slightly can also reduce risk. If they are a persistent problem in your garden, pre-sprouting your seeds indoors (as detailed in Step 3) is a foolproof way to bypass the threat.
Common Diseases and Natural Solutions
- Powdery Mildew: This looks like a white, powdery dusting on the leaves and is common in humid weather.
- Solution: Prevention is key (see above). If it appears, you can treat it by spraying the plant with neem oil or a solution of 1 part milk to 9 parts water. When spraying, be sure to cover the undersides of the leaves thoroughly, as this is often where the mildew starts.
- Root Rot: If your plants are yellowing from the bottom up and look stunted or wilted despite the soil being moist, you may have root rot.
- Solution: Unfortunately, there is no cure for root rot once it takes hold. Prevention is the only solution. It is caused by soil that is too dense and stays waterlogged. This is why choosing a well-drained location and creating raised rows (as mentioned in Step 2) is so critical.
- Wilt Diseases (e.g., Fusarium Wilt): This serious soil-borne fungus causes plants to yellow from the bottom up and wilt, often on just one side of the plant, even when the soil is moist.
- Solution: There is no cure for wilt; prevention is the only strategy. Adhering to a strict 4-year crop rotation is your most effective defense. Additionally, when purchasing seeds, look for varieties labeled as resistant to Fusarium Wilt (often marked with an ‘F’ in the variety code on the packet).
A Final Note on Pests & Diseases: Remember that pest and disease pressures can vary greatly by region. If you encounter a problem you can’t identify, or if the organic methods above are not effective, your best resource is your local University Extension Service. They often provide free, region-specific advice and diagnostics for home gardeners.
Solving Common Problems with Peas
Even with the best care, you might encounter a few hiccups. Here’s how to diagnose and solve some of the most common issues with peas.
Problem: Plants are yellowing, starting from the bottom leaves.
Cause & Solution: This is often a sign of either too much water (soggy soil) or a nitrogen deficiency. Check your soil moisture. If it’s constantly wet, cut back on watering. If the soil is not overly wet and the plants are young, they might need a small nitrogen boost. A light dose of a balanced liquid fertilizer can help.
Problem: Lots of lush, green leaves but very few flowers or pods.
Cause & Solution: This is the classic sign of too much nitrogen. Unfortunately, there’s no quick fix once the fertilizer is in the soil. The best course of action is to avoid adding any more nitrogen and hope the plant eventually shifts its energy from leaf production to flowering.
Problem: Flowers are dropping off without forming pods.
Cause & Solution: This is almost always caused by stress. The most common culprits are heat stress (temperatures consistently over 85°F / 29°C), inconsistent watering (letting the soil go from bone dry to soaked), or a sudden, heavy flooding-style irrigation, which can shock the plant. Ensure the soil is kept consistently moist but not waterlogged during the flowering period.
Problem: Seedlings are tall, pale, and seem weak or floppy.
Cause & Solution: You have “leggy” seedlings. This is caused by one of two things: not enough direct sunlight, or overcrowding. When seedlings are too close together, they are forced to stretch upward in a race for light, resulting in weak, spindly stems. If light isn’t the issue, it’s a sure sign you need to thin your seedlings (as described in Step 4) to give each one the space it needs to grow strong.
Problem: The harvest started strong but then stopped abruptly.
Cause & Solution: The plants have likely exhausted their available nutrients. Producing dozens of pods is energy-intensive work! This is especially common if the plants are running low on potassium. As mentioned in the harvesting and ongoing care sections, the key to a long harvest is to feed your plants with a high-potassium liquid fertilizer every 7-10 days throughout the entire harvest period. This gives them the sustained energy they need to keep producing.